第1章 PyQt5开发环境搭建和配置 PyQt5工具可以快速实现简单的界面开发,包括界面设计、布局管理以及业务逻辑实现(信号与槽)。简单说就是使用PyQt5工具可以快速画一个控件摆放整齐、界面整洁有序、布局合理的界面。
本文内容 本文主要第1节 PyQt5环境搭建和配置。主要内容包括:
[!TIP]
(1)工具版本的选择,包括PyQt版本和Python软件版本。
(2)Python、PyQt5以及Qt Designer工具的安装。Qt
(3)PyCharm上配置Qt Designer和PyUIC工具。
选择PyQt原因 (1)PyQt可以通过拖拽实现界面开发 ,而不是只能代码实现。这样界面实现效率就高多了。
(2)控件丰富 。支持跨平台。
(3)方便打包发布。可以利用Pyinstaller打包成二进制文件。在未安装Python软件电脑上运行。
选择Python3和PyQt5原因 PyQt官网提供了PyQt4和PyQt5两种主流版本。PyQt5不兼容PyQt4。建议选择PyQt5原因 :
(1)官方对PyQt4不再有重大更新和维护。
(2)PyQt5对一些模块进行了重新构建。同时PyQt5对网页的支持能力更好。
(3)PyQt5支持新式的信号和槽,使用更简单。
选择Python3原因 :PyQt5对Python3支持较好,官方默认只提供支持Python3版本的安装包。如果使用Python2,要自己编译,比较麻烦。
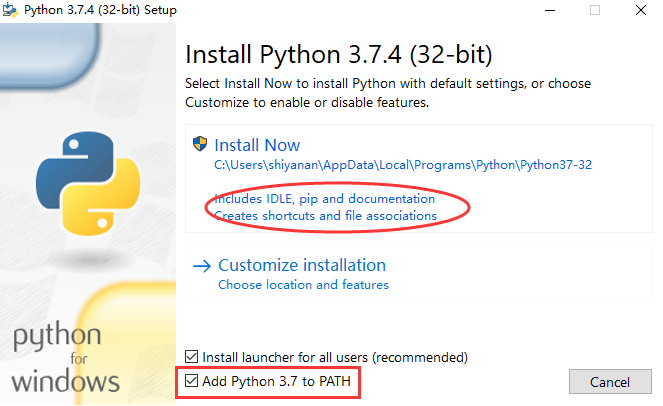
Python3.X软件和PyQt5安装 (1)Python官网下载Python3.X 最新版本。获取路径:Python官网 ,下载32位版本的原因是通常pyqt工具开发完成的程序都需要编译成可执行程序发布。而使用32位额Pyinstaller打包发布exe软件在32位和64位电脑都能运行。如果是64位版本,就只能运行在64位版本电脑。
(2)执行下载的pyhon软件安装。勾选”Add Python3.7 to
(3)pip工具镜像源配置。配置方法如下:
a、在cmd窗口下执行echo
记住,后缀必须是.ini格式。 并在该文件中写入如下内容。
1 2 3 4 [global ] index-url = http://pypi.douban.com/simple [install] trusted-host = pypi.douban.com
c、配置完成。执行pip installPython开发环境搭建指导 >检查,里面有详细步骤。
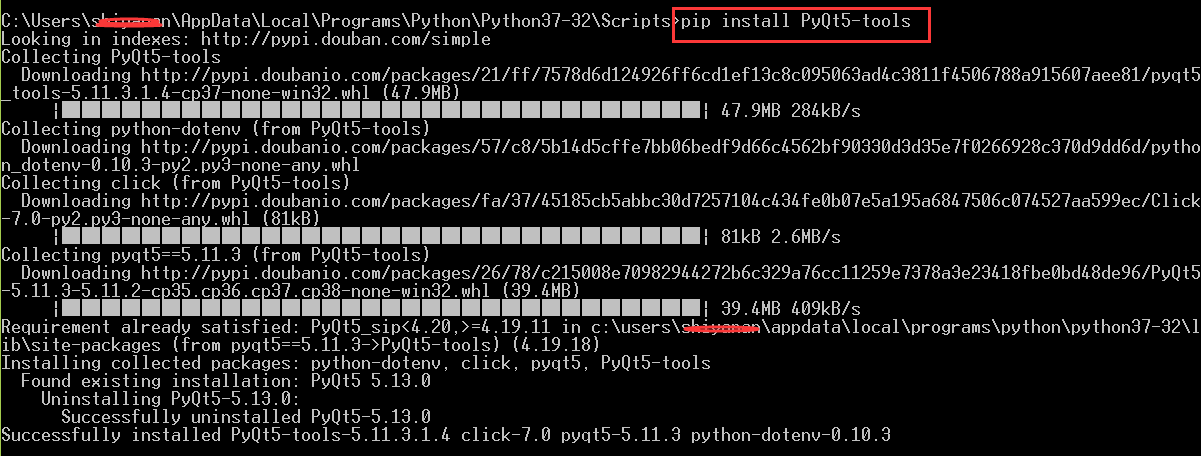
PyQt5工具安装 (1)使用pip工具安装PyQt5工具。执行pip install PyQt5
(2)安装Qt Designer图形界面开发工具。执行pip install PyQt5-tools
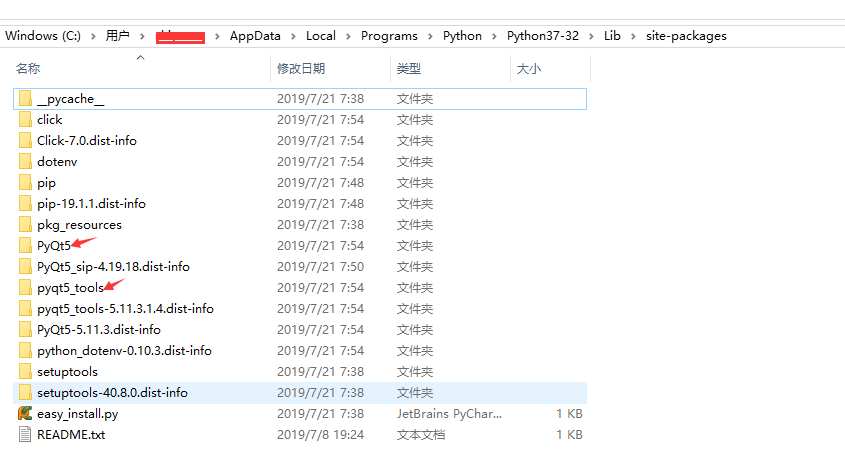
工具安装完成后的路径在..\Python\Python37-32\Lib\site-packages
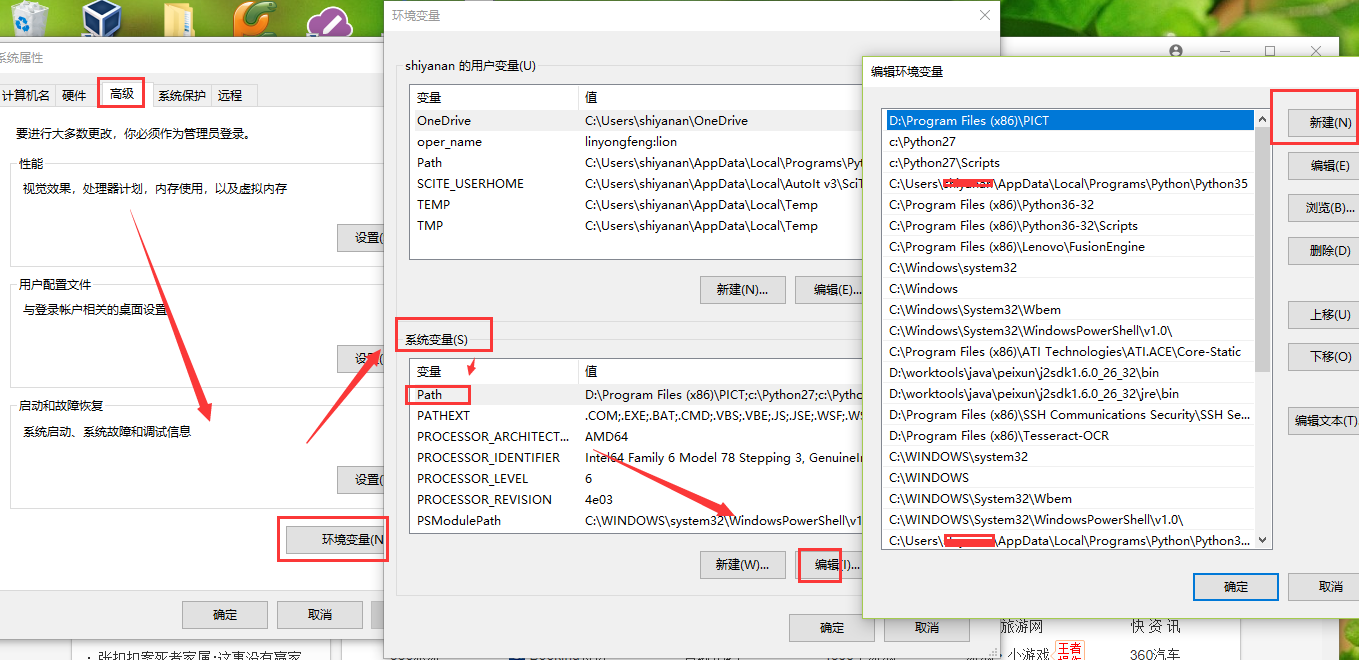
(3)环境变量配置。将PyQt5-tools的安装目录添加到系统环境变量path。添加路径:我的电脑
(4)打开cmd窗口,执行designer。其实也可以将designer.exe设置快捷家到桌面。
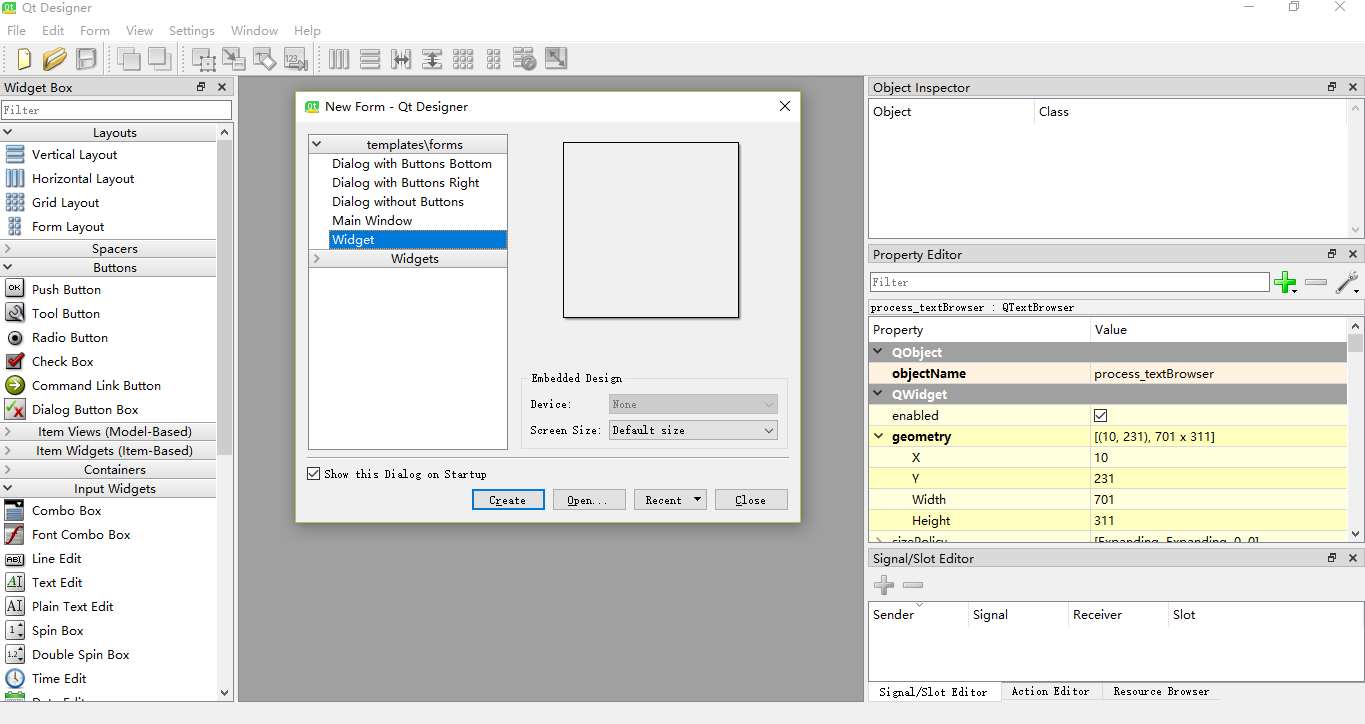
Qt Designer主界面如下:
PyCharm配置Qt Designer PyCharm是开发Python程序主流常用的IDE 。为方便调用Qt
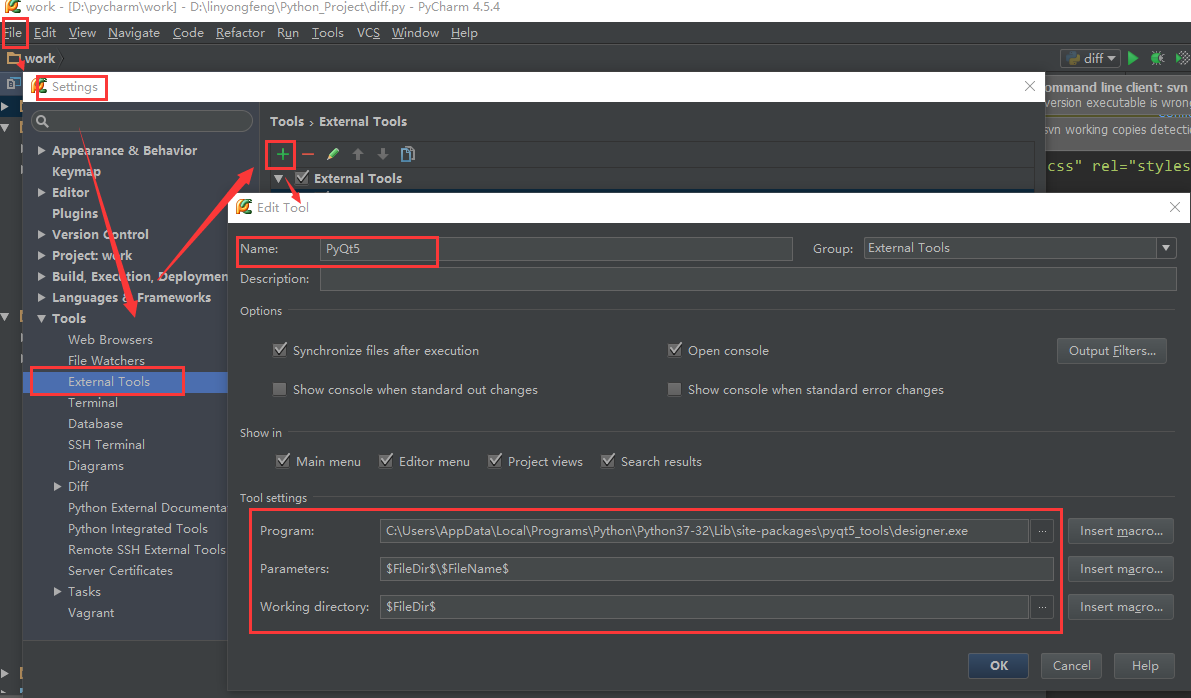
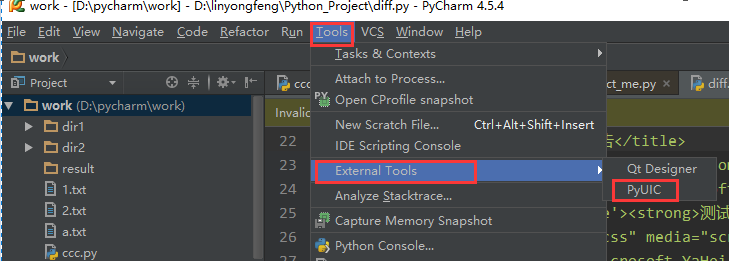
(1)配置Qt Designer。PyCharm -> 菜单File ->
Name :Qt Designer。方便记忆。实际可以任意取值。
Program :designer.exe程序绝对路径。根据实际安装路径填写。
Parameters :\FileDir\ $FileName$。固定取值。
Working directory :\FileDir\ 。固定取值。
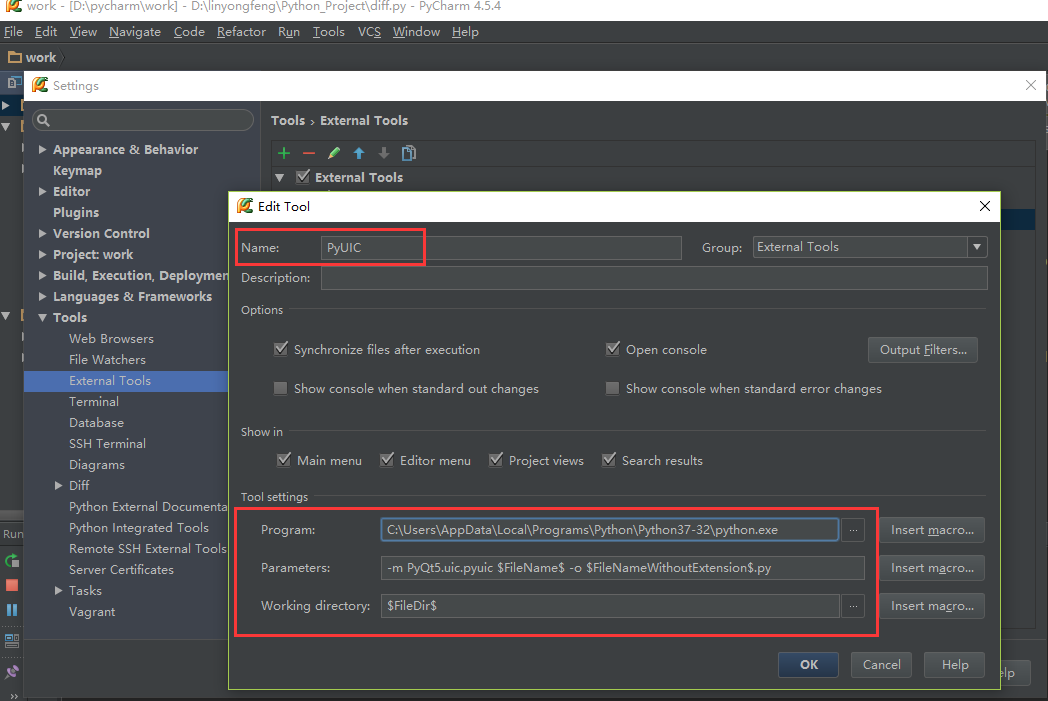
(2)配置PyUIC。该工具是用于将Qt
Name :PyUIC。方便记忆。实际可以任意取值。
Program :python.exe程序绝对路径。根据实际安装路径填写。
Parameters :-m PyQt5.uic.pyuic\FileName\ -o\FileNameWithoutExtension\ .py。固定取值。
Working directory :\FileDir\ 。固定取值。
命令行工具:python -m PyQt5.uic.pyuic demo.ui -o demo.py
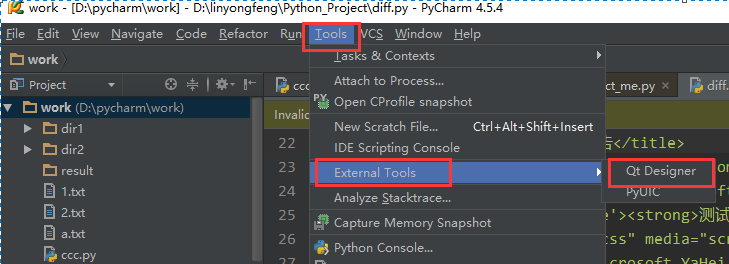
(3)测试QtTools
点击Qt Designer,打开Designer程序主界面如下。将左侧Widget Box中Push
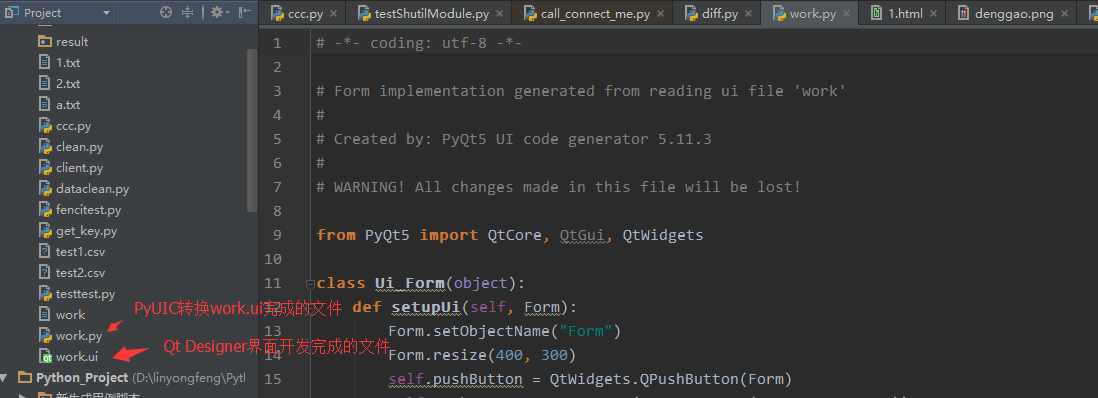
打开PyUIC,自动完成work.ui文件的转换。生成文件名为work.ui。
文件转换成功后,可以在project目录中查看。如下
配置成功。完成
命令行打开designer和转换.ui文件 除了集成到Pycharm 工具使用,也可以采用命令行方式打开designer 和通过命令转换.ui文件为.py文件,我个人习惯使用这种方法。方法如下:
(1)设置designer 为桌面快捷方式。designer 路径在${python安装目录}/Lib/site-packages/pyqt5_tools/designer.exe
(2)假设designer.exe 开发完成的界面文件为work.u i。切换到work.ui 目录并执行如下命令转换:
pyuic5 -o work****.py work.ui
第2章 PyQt窗口布局管理Qt Designer 这节课很重要。。界面整洁美观与否就看布局了。。这里讲布局方法,至于设计的天赋与最终界面的美感那就看造化了。。
本文主要讲述Qt 工具实现界面控件布局管理,就是排列组合控件。包括水平布局、垂直布局、网格布局、表单布局。至于绝对布局太复杂。。短期内hold不住
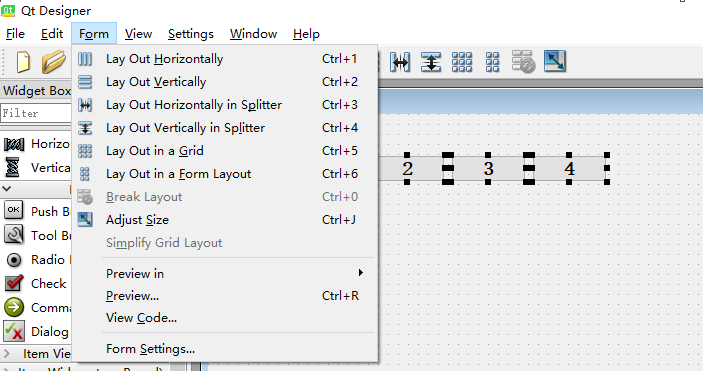
布局管理打开方法 方法一:Qt Designer -> Form菜单栏
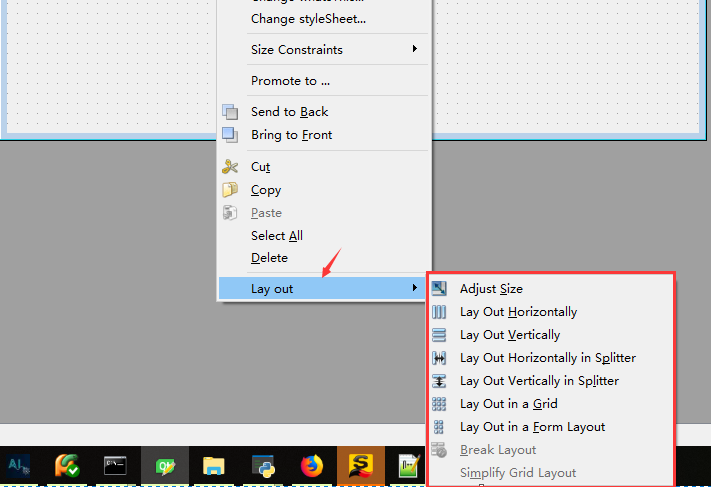
方法二:右键单击主窗口 -> Lay out
四种布局管理介绍 (1)水平布局 Lay Out
(2)垂直布局 Lay Out
(3)表单布局Lay Out in a
(4)网格布局 Lay Out in a
嵌套布局 界面控件类型简单可以考虑采用上述四种布局方式进行单一布局。但是控件类型多样化的话就要考虑布局的嵌套了。就是分析控件的特点,采用不同布局方式组合控件。
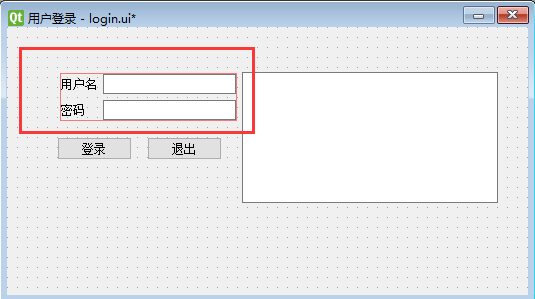
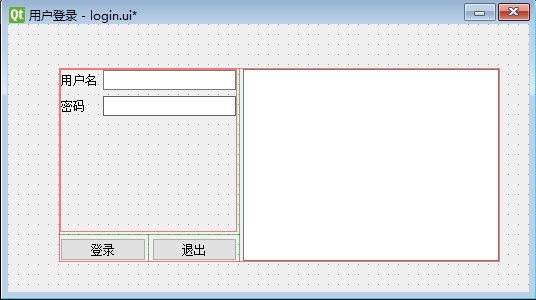
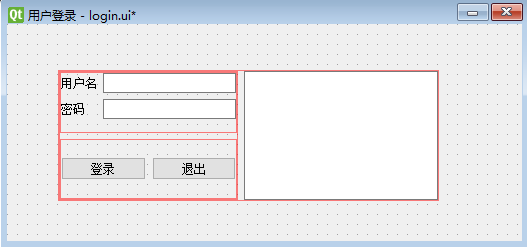
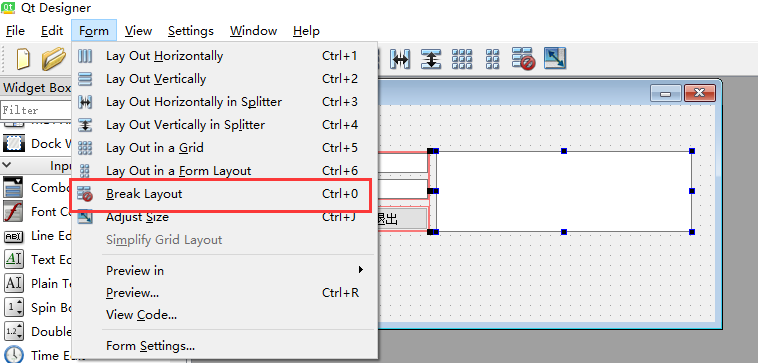
如下主窗口中用户名+密码的标签+单行输入框控件组合使用表单布局,然后与登录+退出控件使用垂直布局,最后与显示文本框采用网格布局。具体效果如下
注意:组合控件使用的布局如果需要打破布局,可以通过选择组合的控件,然后单击菜单Form
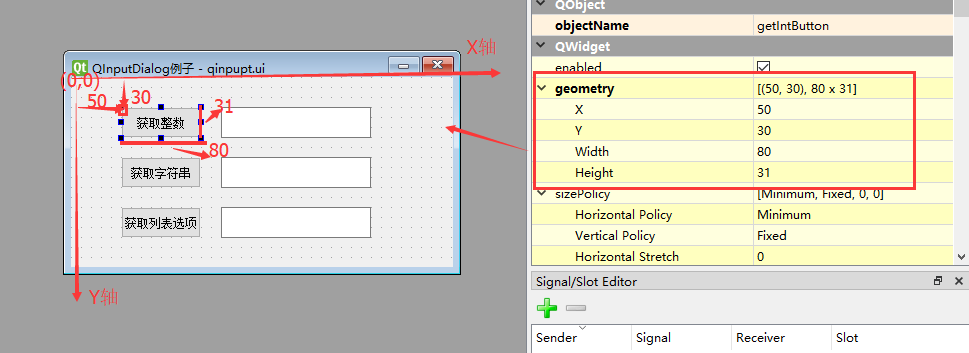
绝对布局管理 某些时候采用布局管理工具完成的界面设置并不满足你的要求,可以考虑修改控件geometry属性相对坐标及长、框的方式进行对齐。geometry属性在PyQt中主要用来设置控件在窗口中的绝对坐标与控件自身的大小。如下图所示。对于包含控件类型及个数不多的界面可以考虑采用这种方式。
下面针对这几个控件的对齐简单描述一下。
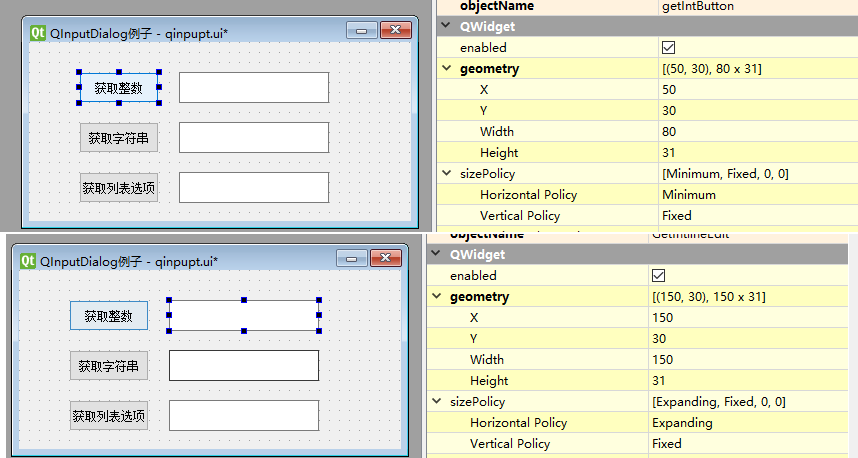
第一行中**”获取整数”按钮与 “lineEdit”**两个控件对齐:控件Y轴数值、Height长度值保持一致。控件间隔通过计算获取。这里两个控件间隔为150-80-50=30
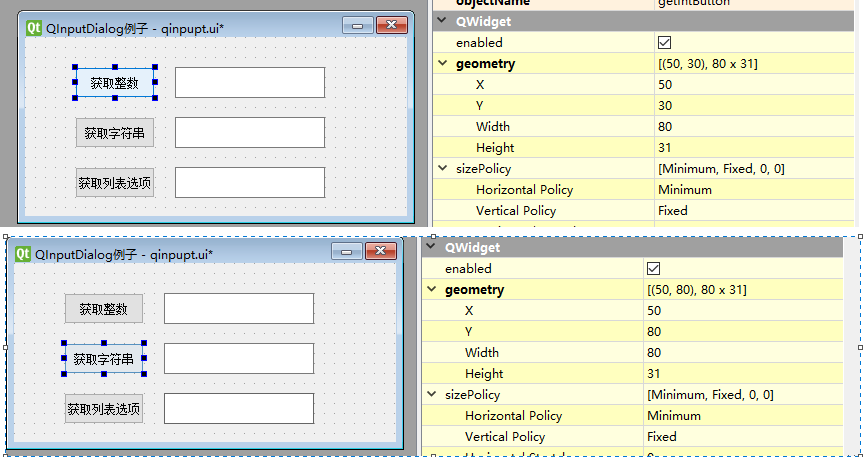
第一列**”获取整数”和 “获取字符串”控件对齐:保持X轴数值、Width数值一致。列间间距为80-31-30=19。这样 “获取列表选项”**控件也以间距19保持即可。
是不是很简单?如果觉得布局管理出来效果不好,就动手尝试一下这种方法把。。
其他布局管理 1、采用绝对布局的方式进行控件布局。但是这种上手难度比较大,后面在实践过程中遇到有好的方法可以针对Qt界面布局管理后的效果进行优化的再补充介绍。
2、修改控件属性。通过修改控件的属性,比如最小尺寸、最大尺寸、长、宽、字体等等。比如我想针对小工具的需求我会经常使用固定最小尺寸、最大尺寸保持一致的方式,使主窗口及控件不受拉伸影响。
第3章 PyQt5信号与槽 信号 和槽 是PyQt编程对象之间进行通信的机制。每个继承自QWideget的控件都支持信号与槽机制。信号发射时(发送请求),连接的槽函数就会自动执行(针对请求进行处理)。本文主要讲述信号和槽最基本、最经常使用方法。就是内置信号和槽的使用的使用方法。
内置信号和槽 所谓内置信号与槽的使用。是指在发射信号时,使用窗口控件的函数,而不是自定义的函数。信号与槽的连接方法是通过QObject.signal.connect将一个QObject的信号连接到另一个QObject的槽函数。
在任何GUI设计中,按钮都是最重要的和常用的触发动作请求的方式,用来与用户进行交互操作。常见的按钮包括QPushButton、QRadioButton和QCheckBox。这些按钮都继承自QAbstractButton类,QAbstractButton提供的信号包括:
Clicked :鼠标左键点击按钮并释放触发该信号。最常用。记住这个就差不多够了。
Pressed :鼠标左键按下时触发该信号
Released :鼠标左键释放时触发该信号
Toggled :控件标记状态发生改变时触发该信号。
内置信号和槽使用实例 这里实现一个点击按钮退出界面需求实现过程来介绍内置信号和槽。开始动手。。。
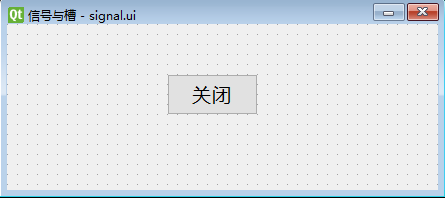
Step1 :打开Qt
Step2 :使用pyuic5 -o i转换成.py格式。
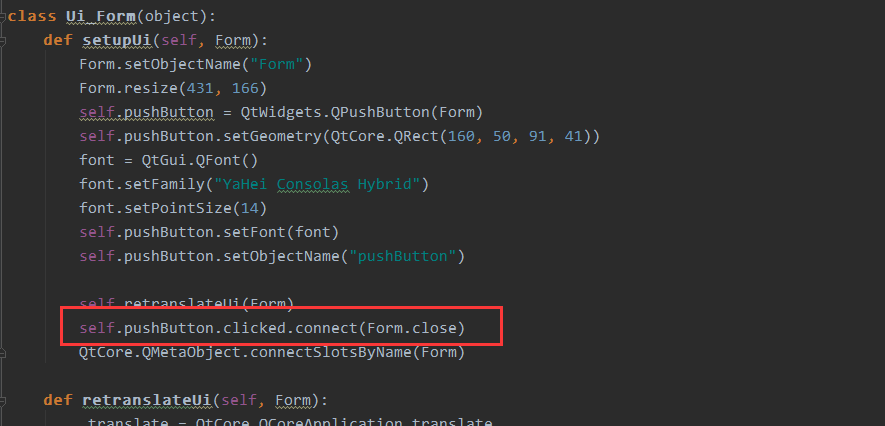
Step3 :为考虑介绍方便,将调用程序在singal.py 中主程序。其中MyMainForm 类中的命令行为Push
self.pushButton.clicked.connect(self.close)
完整代码如下(可直接拷贝运行,字体加粗部分为添加部分):
1 2 3 4 5 6 7 8 9 10 11 12 13 14 15 16 17 18 19 20 21 22 23 24 25 26 27 28 29 30 31 32 33 34 35 36 37 38 39 40 41 42 43 import sysfrom PyQt5 import QtCore, QtGui, QtWidgetsfrom PyQt5.QtWidgets import QApplication, QMainWindow, QMessageBoxclass Ui_Form (object ): def setupUi (self, Form ): Form.setObjectName("Form" ) Form.resize(431 , 166 ) self.pushButton = QtWidgets.QPushButton(Form) self.pushButton.setGeometry(QtCore.QRect(160 , 50 , 91 , 41 )) font = QtGui.QFont() font.setFamily("YaHei Consolas Hybrid" ) font.setPointSize(14 ) self.pushButton.setFont(font) self.pushButton.setObjectName("pushButton" ) self.retranslateUi(Form) QtCore.QMetaObject.connectSlotsByName(Form) def retranslateUi (self, Form ): _translate = QtCore.QCoreApplication.translate Form.setWindowTitle(_translate("Form" , "信号与槽" )) self.pushButton.setText(_translate("Form" , "关闭" )) class MyMainForm (QMainWindow, Ui_Form): def __init__ (self, parent=None ): super (MyMainForm, self).__init__(parent) self.setupUi(self) self.pushButton.clicked.connect(self.close) if __name__ == "__main__" : app = QApplication(sys.argv) myWin = MyMainForm() myWin.show() sys.exit(app.exec_())
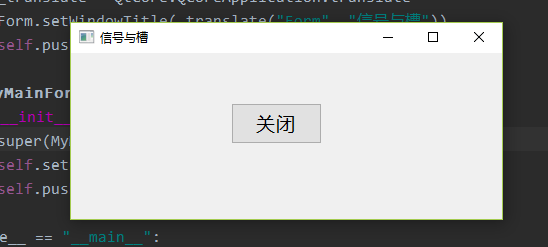
运行并点击如下按钮就可以关闭窗口
内置信号和自定义槽使用实例
实现过程同上述步骤一样。槽函数showMsg 为自定义函数。
信号与槽:self.pushButton.clicked.connect(self.showMsg)
完整代码如下(可直接拷贝运行,字体加粗部分为添加部分):
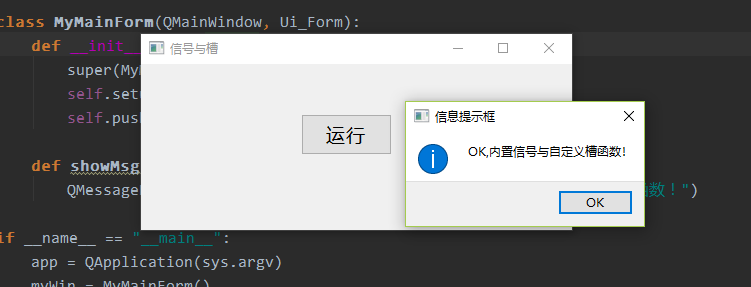
1 2 3 4 5 6 7 8 9 10 11 12 13 14 15 16 17 18 19 20 21 22 23 24 25 26 27 28 29 30 31 32 33 34 35 36 37 38 39 40 41 42 43 44 45 import sysfrom PyQt5 import QtCore, QtGui, QtWidgetsfrom PyQt5.QtWidgets import QApplication, QMainWindow, QMessageBoxclass Ui_Form (object ): def setupUi (self, Form ): Form.setObjectName("Form" ) Form.resize(431 , 166 ) self.pushButton = QtWidgets.QPushButton(Form) self.pushButton.setGeometry(QtCore.QRect(160 , 50 , 91 , 41 )) font = QtGui.QFont() font.setFamily("YaHei Consolas Hybrid" ) font.setPointSize(14 ) self.pushButton.setFont(font) self.pushButton.setObjectName("pushButton" ) self.retranslateUi(Form) QtCore.QMetaObject.connectSlotsByName(Form) def retranslateUi (self, Form ): _translate = QtCore.QCoreApplication.translate Form.setWindowTitle(_translate("Form" , "信号与槽" )) self.pushButton.setText(_translate("Form" , "运行" )) class MyMainForm (QMainWindow, Ui_Form): def __init__ (self, parent=None ): super (MyMainForm, self).__init__(parent) self.setupUi(self) self.pushButton.clicked.connect(self.showMsg) def showMsg (self ): QMessageBox.information(self, "信息提示框" , "OK,内置信号与自定义槽函数!" ) if __name__ == "__main__" : app = QApplication(sys.argv) myWin = MyMainForm() myWin.show() sys.exit(app.exec_())
运行结果如下:
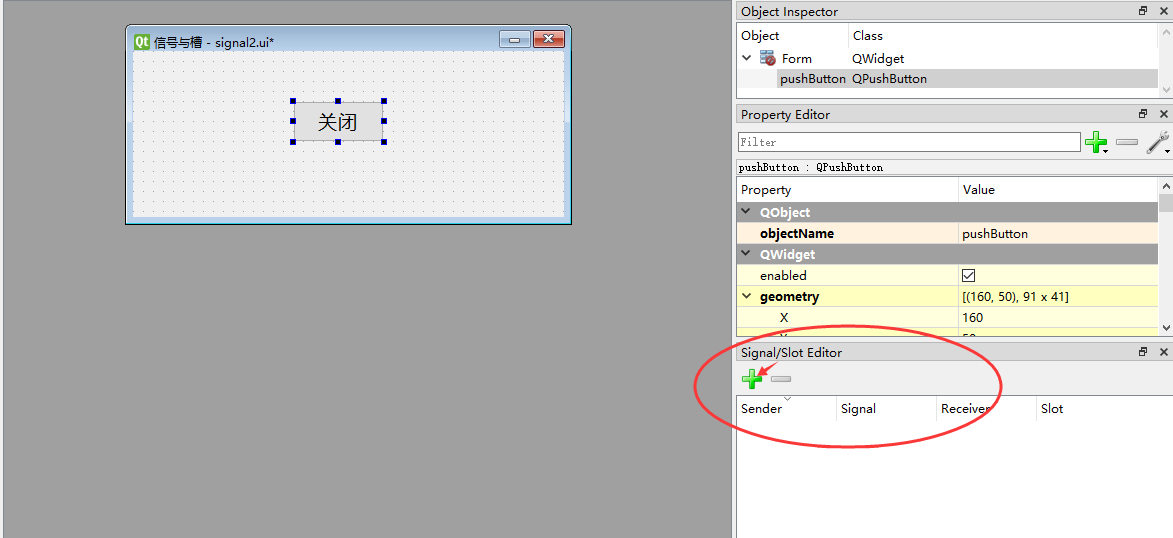
Qt Designer添加控件信号与槽 上述介绍的内容是通过代码方式实现内置信号与槽的连接。那Qt
还是以添加内置信号与槽来介绍。
Step1 :打开Qt
Step2 :点击+号
Step3 :保存.ui格式,并使用pyuic转换成.py格式,添加调用程序,运行。效果一样。这些步骤都介绍过,不再重复介绍,关键代码如下:
第4章 PyQt5基本控件使用:单选按钮、复选框、下拉框、文本框 本文主要介绍PyQt5界面最基本使用的单选按钮、复选框、下拉框三种控件的使用方法进行介绍。
1、RadioButton单选按钮/CheckBox复选框。需要知道如何判断单选按钮是否被选中。
2、ComboBox下拉框。需要知道如何对下拉框中的取值进行设置以及代码实现中如何获取用户选中的值。
带着这些问题下面开始介绍这RadioButton单选按钮、CheckBox复选框、ComboBox下拉框三种基本控件的使用方法
单选按钮为用户提供多选一 的选择,是一种开关按钮。QRadioButton 单选按钮是否选择状态通过isChecked() 方法判断。isChecked() 方法返回值True表示选中,False表示未选中。
1 2 3 4 5 6 7 8 9 10 11 12 13 14 15 16 17 18 19 20 21 22 23 24 25 26 27 28 29 30 31 32 33 34 35 36 37 38 39 40 41 import sysfrom PyQt5 import QtCore, QtGui, QtWidgetsfrom PyQt5.QtWidgets import QApplication, QMainWindow, QMessageBox, QRadioButtonclass Ui_Form (object ): def setupUi (self, Form ): Form.setObjectName("Form" ) Form.resize(309 , 126 ) self.radioButton = QtWidgets.QRadioButton(Form) self.radioButton.setGeometry(QtCore.QRect(70 , 40 , 89 , 16 )) self.radioButton.setObjectName("radioButton" ) self.okButton = QtWidgets.QPushButton(Form) self.okButton.setGeometry(QtCore.QRect(70 , 70 , 75 , 23 )) self.okButton.setObjectName("okButton" ) self.retranslateUi(Form) QtCore.QMetaObject.connectSlotsByName(Form) def retranslateUi (self, Form ): _translate = QtCore.QCoreApplication.translate Form.setWindowTitle(_translate("Form" , "RadioButton单选按钮例子" )) self.radioButton.setText(_translate("Form" , "单选按钮" )) self.okButton.setText(_translate("Form" , "确定" )) class MyMainForm (QMainWindow, Ui_Form): def __init__ (self, parent=None ): super (MyMainForm, self).__init__(parent) self.setupUi(self) self.okButton.clicked.connect(self.checkRadioButton) def checkRadioButton (self ): if self.radioButton.isChecked(): QMessageBox.information(self,"消息框标题" ,"我RadioButton按钮被选中啦!" ,QMessageBox.Yes | QMessageBox.No) if __name__ == "__main__" : app = QApplication(sys.argv) myWin = MyMainForm() myWin.show() sys.exit(app.exec_())
运行结果如下:
关键代码介绍:
self.radioButton.isChecked() –>
QCheckBox复选框 复选框和单选按钮一样都是选项按钮,区别是复选框为用户提供多选多 的选择。复选框按钮同样是使用isChecked()方法判断是否被选中。
CheckBox例子完整代码如下: 1 2 3 4 5 6 7 8 9 10 11 12 13 14 15 16 17 18 19 20 21 22 23 24 25 26 27 28 29 30 31 32 33 34 35 36 37 38 39 40 41 42 43 44 45 46 47 48 49 50 51 52 53 54 import sysfrom PyQt5 import QtCore, QtGui, QtWidgetsfrom PyQt5.QtWidgets import QApplication, QMainWindow, QMessageBox, QCheckBoxclass Ui_Form (object ): def setupUi (self, Form ): Form.setObjectName("Form" ) Form.resize(380 , 154 ) self.freshcheckBox = QtWidgets.QCheckBox(Form) self.freshcheckBox.setGeometry(QtCore.QRect(50 , 40 , 71 , 31 )) font = QtGui.QFont() font.setPointSize(14 ) self.freshcheckBox.setFont(font) self.freshcheckBox.setObjectName("freshcheckBox" ) self.bearcheckBox = QtWidgets.QCheckBox(Form) self.bearcheckBox.setGeometry(QtCore.QRect(140 , 40 , 71 , 31 )) font = QtGui.QFont() font.setPointSize(14 ) self.bearcheckBox.setFont(font) self.bearcheckBox.setObjectName("bearcheckBox" ) self.okButton = QtWidgets.QPushButton(Form) self.okButton.setGeometry(QtCore.QRect(230 , 40 , 71 , 31 )) font = QtGui.QFont() font.setPointSize(14 ) self.okButton.setFont(font) self.okButton.setObjectName("okButton" ) self.retranslateUi(Form) QtCore.QMetaObject.connectSlotsByName(Form) def retranslateUi (self, Form ): _translate = QtCore.QCoreApplication.translate Form.setWindowTitle(_translate("Form" , "CheckBox例子" )) self.freshcheckBox.setText(_translate("Form" , "鱼" )) self.bearcheckBox.setText(_translate("Form" , "熊掌" )) self.okButton.setText(_translate("Form" , "确定" )) class MyMainForm (QMainWindow, Ui_Form): def __init__ (self, parent=None ): super (MyMainForm, self).__init__(parent) self.setupUi(self) self.okButton.clicked.connect(self.checkCheckBox) def checkCheckBox (self ): if self.freshcheckBox.isChecked() and self.bearcheckBox.isChecked(): QMessageBox.information(self,"消息框标题" ,"鱼和熊掌我要兼得!" ,QMessageBox.Yes | QMessageBox.No) if __name__ == "__main__" : app = QApplication(sys.argv) myWin = MyMainForm() myWin.show() sys.exit(app.exec_())
运行结果如下:
关键代码介绍:
self.freshcheckBox.isChecked() andself.bearcheckBox.isChecked() –>isChecked() 函数判断。
QComboBox下拉列表框 下拉列表框是一个集按钮和下拉选项于一体的控件。通常用于固定的枚举值供用户选择时使用。对于下拉列表框的使用最基本的是要知道如何添加下拉列表框中的值以及如何获取下拉框中选择的值。
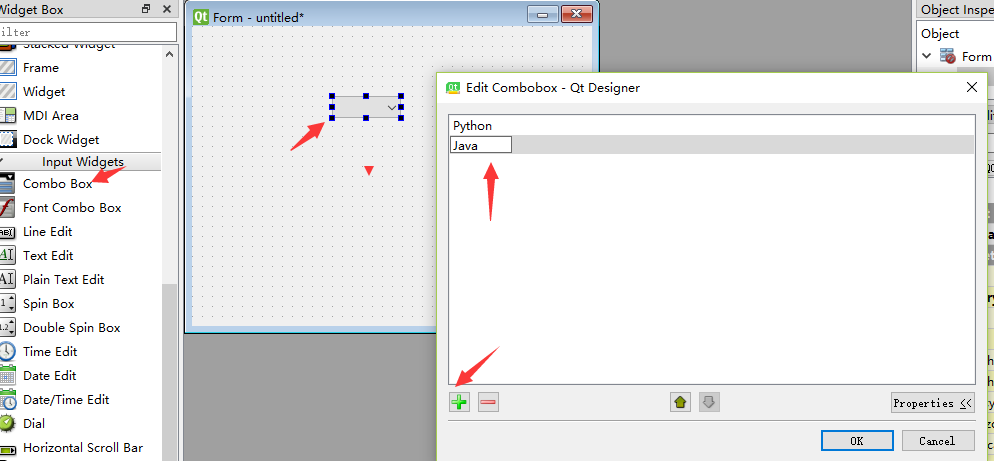
(1)如何添加下拉列表框中的值。
1、使用addItem() 添加一个下拉选项或者additems() 从列表中添加下拉选项
2、如果使用Qt
(2)如何获取下拉框中的取值
使用函数currentText() 返回选项中的文本进行获取
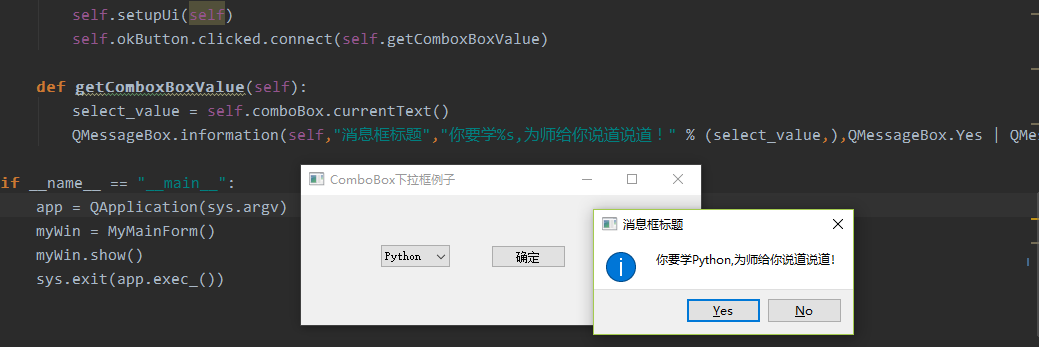
ComboBox示例完整代码如下: 1 2 3 4 5 6 7 8 9 10 11 12 13 14 15 16 17 18 19 20 21 22 23 24 25 26 27 28 29 30 31 32 33 34 35 36 37 38 39 40 41 42 43 44 45 46 47 48 import sysfrom PyQt5 import QtCore, QtGui, QtWidgetsfrom PyQt5.QtWidgets import QApplication, QMainWindow, QMessageBox, QComboBoxclass Ui_Form (object ): def setupUi (self, Form ): Form.setObjectName("Form" ) Form.resize(400 , 130 ) self.comboBox = QtWidgets.QComboBox(Form) self.comboBox.setGeometry(QtCore.QRect(80 , 50 , 69 , 22 )) self.comboBox.setObjectName("comboBox" ) self.comboBox.addItem("" ) self.comboBox.addItem("" ) self.comboBox.addItem("" ) self.comboBox.addItem("" ) self.okButton = QtWidgets.QPushButton(Form) self.okButton.setGeometry(QtCore.QRect(190 , 50 , 75 , 23 )) self.okButton.setObjectName("okButton" ) self.retranslateUi(Form) QtCore.QMetaObject.connectSlotsByName(Form) def retranslateUi (self, Form ): _translate = QtCore.QCoreApplication.translate Form.setWindowTitle(_translate("Form" , "ComboBox下拉框例子" )) self.comboBox.setItemText(0 , _translate("Form" , "Python" )) self.comboBox.setItemText(1 , _translate("Form" , "C++" )) self.comboBox.setItemText(2 , _translate("Form" , "Go" )) self.comboBox.setItemText(3 , _translate("Form" , "Java" )) self.okButton.setText(_translate("Form" , "确定" )) class MyMainForm (QMainWindow, Ui_Form): def __init__ (self, parent=None ): super (MyMainForm, self).__init__(parent) self.setupUi(self) self.okButton.clicked.connect(self.getComboxBoxValue) def getComboxBoxValue (self ): select_value = self.comboBox.currentText() QMessageBox.information(self,"消息框标题" ,"你要学%s,为师给你说道说道!" % (select_value,),QMessageBox.Yes | QMessageBox.No) if __name__ == "__main__" : app = QApplication(sys.argv) myWin = MyMainForm() myWin.show() sys.exit(app.exec_())
运行结果如下:
关键代码介绍:
select_value = self.comboBox.currentText() –>
文本框控件(QLineEdit、QTextEdit) 文本框控件分为单行文本框(QLineEdit)和多行文本框(QTextEdit)。单行文本框只允许输入一行字符串。多行文本框可以显示多行文本内容,当文本内容超出控件显示范围时,可以显示水平和垂直滚动条。
针对文本框控件,这里主要了解文本框内容的设置、获取以及清除三种主要方法。单行文本框和多行文本框的设置和获取方法不同,如下。
单行文本框(QLineEdit)方法如下:
setText():设置单行文本框内容。
Text():返回文本框内容
clear():清除文本框内容
多行文本框(QTextEdit)方法如下:
setPlainText():设置多行文本框的文本内容。
toPlainText():获取多行文本框的文本内容。
clear():清除多行文本框的内容
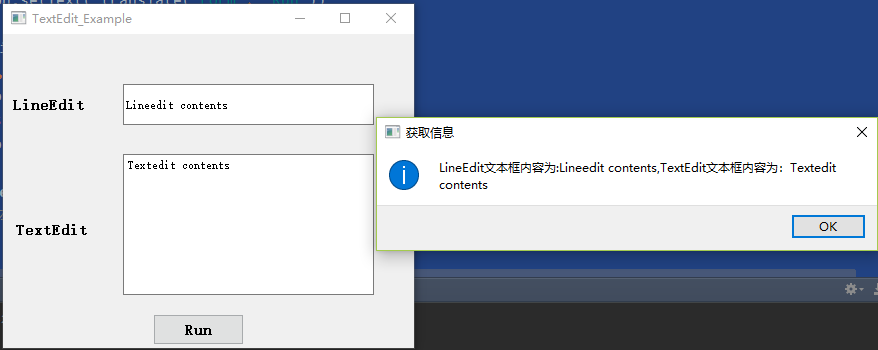
文本框使用实例如下: 1 2 3 4 5 6 7 8 9 10 11 12 13 14 15 16 17 18 19 20 21 22 23 24 25 26 27 28 29 30 31 32 33 34 35 36 37 38 39 40 41 42 43 44 45 46 47 48 49 50 51 52 53 54 55 56 57 58 59 60 61 62 63 64 65 66 67 68 69 70 71 72 73 74 75 76 77 import sysfrom PyQt5 import QtCore, QtGui, QtWidgetsfrom PyQt5.QtWidgets import QApplication, QMainWindow, QMessageBox, QComboBoxclass Ui_Form (object ): def setupUi (self, Form ): Form.setObjectName("Form" ) Form.resize(411 , 314 ) self.lineEdit = QtWidgets.QLineEdit(Form) self.lineEdit.setGeometry(QtCore.QRect(120 , 50 , 251 , 41 )) self.lineEdit.setObjectName("lineEdit" ) self.lineedit_label = QtWidgets.QLabel(Form) self.lineedit_label.setGeometry(QtCore.QRect(10 , 60 , 81 , 20 )) font = QtGui.QFont() font.setPointSize(11 ) font.setBold(True ) font.setWeight(75 ) self.lineedit_label.setFont(font) self.lineedit_label.setObjectName("lineedit_label" ) self.textEdit = QtWidgets.QTextEdit(Form) self.textEdit.setGeometry(QtCore.QRect(120 , 120 , 251 , 141 )) self.textEdit.setObjectName("textEdit" ) self.textedit_label = QtWidgets.QLabel(Form) self.textedit_label.setGeometry(QtCore.QRect(13 , 180 , 81 , 31 )) font = QtGui.QFont() font.setPointSize(11 ) font.setBold(True ) font.setWeight(75 ) self.textedit_label.setFont(font) self.textedit_label.setObjectName("textedit_label" ) self.run_Button = QtWidgets.QPushButton(Form) self.run_Button.setGeometry(QtCore.QRect(150 , 280 , 91 , 31 )) font = QtGui.QFont() font.setPointSize(11 ) font.setBold(True ) font.setWeight(75 ) self.run_Button.setFont(font) self.run_Button.setObjectName("run_Button" ) self.retranslateUi(Form) QtCore.QMetaObject.connectSlotsByName(Form) def retranslateUi (self, Form ): _translate = QtCore.QCoreApplication.translate Form.setWindowTitle(_translate("Form" , "TextEdit_Example" )) self.lineedit_label.setText(_translate("Form" , "LineEdit" )) self.textedit_label.setText(_translate("Form" , "TextEdit" )) self.run_Button.setText(_translate("Form" , "Run" )) class MyMainForm (QMainWindow, Ui_Form): def __init__ (self, parent=None ): super (MyMainForm, self).__init__(parent) self.setupUi(self) self.run_Button.clicked.connect(self.set_display_edit) def set_display_edit (self ): self.lineEdit.clear() self.textEdit.clear() self.lineEdit.setText("Lineedit contents" ) self.textEdit.setPlainText("Textedit contents" ) str1 = self.lineEdit.text() str2 = self.textEdit.toPlainText() QMessageBox.information(self,"获取信息" ,"LineEdit文本框内容为:%s,TextEdit文本框内容为:%s" %(str1,str2)) if __name__ == "__main__" : app = QApplication(sys.argv) myWin = MyMainForm() myWin.show() sys.exit(app.exec_())
运行结果如下:
关键代码如下: def set_display_edit(self):
#设置前先清除文本内容
self.lineEdit.clear()
self.textEdit.clear()
#设置文本框内容
self.lineEdit.setText("Lineedit contents")
self.textEdit.setPlainText("Textedit contents")
#获取文本框内容,并弹框显示内容
str1 = self.lineEdit.text()
str2 = self.textEdit.toPlainText()
QMessageBox.information(self,"获取信息","LineEdit文本框内容为:%s,TextEdit文本框内容为:%s" %(str1,str2))
第5章 PyQt5基本控件使用:消息弹出、用户输入、文件/目录选择对话框 本章主要介绍PyQt界面实现中常用的消息弹出对话框、提供用户输入的输入框、打开文件获取文件/目录路径的文件对话框。学习这三种控件前,先想一下它们使用的主要场景:
1、消息弹出对话框。程序遇到问题需要退出需要弹出错误提示框
2、用户输入框。比如常见的让用户选择执行的程序分支、yes/no等等。
3、文件对话框。获取本地文件或者文件夹的完整路径甚至是直接打开文件显示文件内容。
本文主要针对这三种控件的主要场景进行介绍。
QMessageBox:弹出消息对话框控件 QMessageBox是一种通用的弹出式对话框,用于显示消息,允许用户通过单击不同的标准按钮对消息进行反馈。弹出式对话框有很多类型,如提示、警告、错误、询问、关于等对话框。这些不同类型的QMessageBox对话框只是显示时图标不同,其他功能一样。
QMessageBox类中常用方法
information(QWdiget
question(QWidget
warning(QWidget parent,title,text,buttons,defaultButton):弹出警告对话框
critical(QWidget
about(QWidget parent,title,text):弹出关于对话
参数解释如下:
parent:指定的父窗口控件。
title:表示对话框标题。
text:表示对话框文本。
buttons:表示多个标准按钮,默认为ok按钮。
defaultButton表示默认选中的标准按钮,默认选中第一个标准按钮。
其他方法如下:
setTitle():设置标题
setText():设置正文消息
setIcon():设置弹出对话框的图片
QMessageBox的标准按钮类型
QMessage.Ok 同意操作、QMessage.Cancel 取消操作、QMessage.Yes
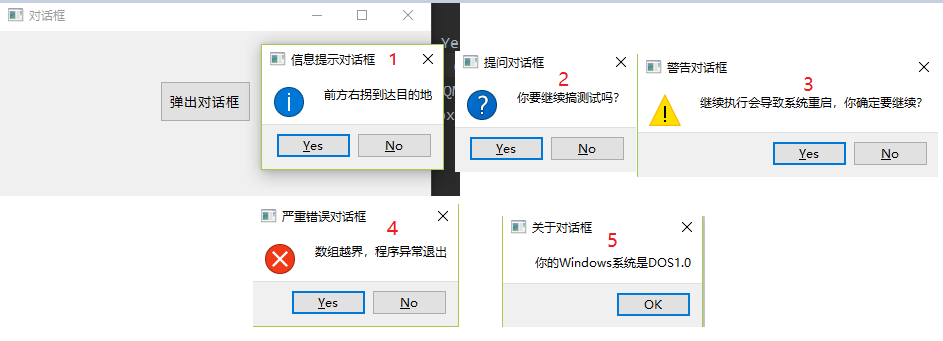
5种常用的消息对话框及其显示效果 提前说明:from PyQt5.QtWidgets import QMessageBox 导入直接使用
(1)消息对话框,用来告诉用户关于提示信息 QMessageBox.information(self,
(2)提问对话框,用来告诉用户关于提问消息。 QMessageBox.question(self, “提问对话框”, “你要继续搞测试吗?”,
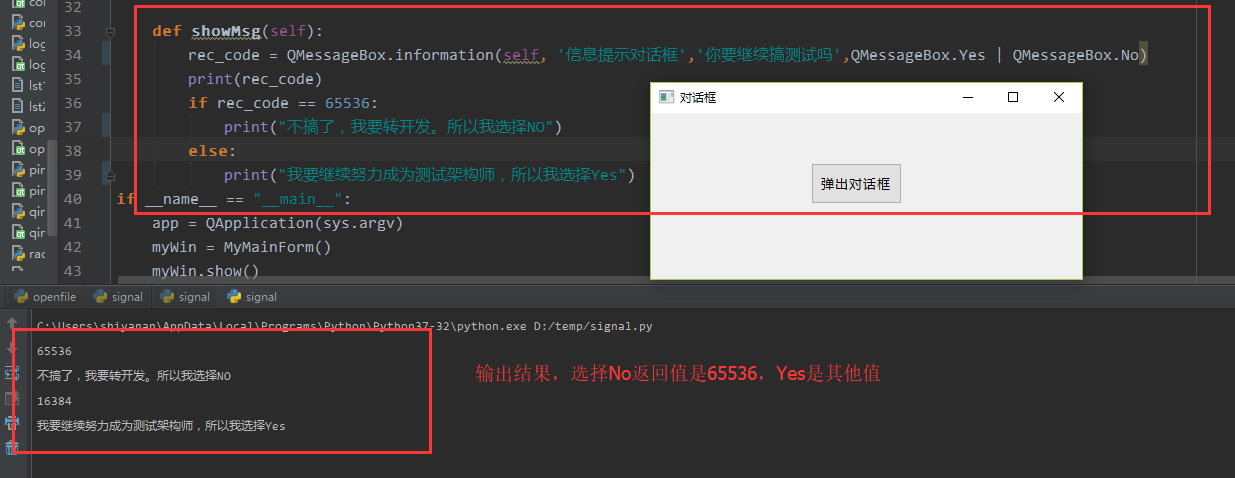
特别注意Tips: 对于提问对话框,需要根据用户选择Yes或者No进行下一步判断,可以获取按钮点击的返回值进行判断,选择NO的返回值为65536,选择Yes的返回值为其他 。。示例如下:
(3)警告对话框,用来告诉用户关于不寻常的错误消息。 QMessageBox.warning(self, “警告对话框”,
(4)严重错误对话框,用来告诉用户关于程序执行失败的严重的错误消息。 QMessageBox.critical(self, “严重错误对话框”, “数组越界,程序异常退出”,
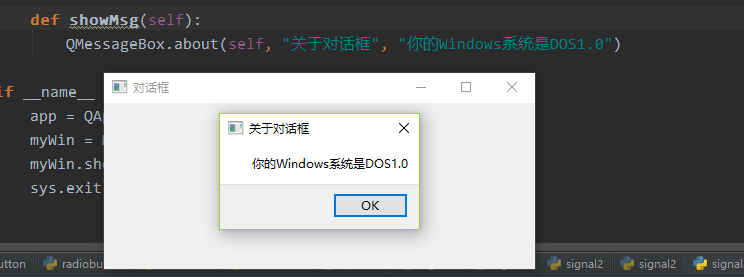
(5)关于对话框 QMessageBox.about(self, “关于对话框”, “你的Windows系统是DOS1.0”)
上述程序完整代码如下:
# -*- coding: utf-8 -*-
import sys
from PyQt5 import QtCore, QtGui, QtWidgets
from PyQt5.QtWidgets import QApplication, QMainWindow, QMessageBox
class Ui_Form(object):
def setupUi(self, Form):
Form.setObjectName("Form")
Form.resize(431, 166)
self.pushButton = QtWidgets.QPushButton(Form)
self.pushButton.setGeometry(QtCore.QRect(160, 50, 91, 41))
font = QtGui.QFont()
font.setFamily("YaHei Consolas Hybrid")
font.setPointSize(10)
self.pushButton.setFont(font)
self.pushButton.setObjectName("pushButton")
self.retranslateUi(Form)
QtCore.QMetaObject.connectSlotsByName(Form)
def retranslateUi(self, Form):
_translate = QtCore.QCoreApplication.translate
Form.setWindowTitle(_translate("Form", "对话框"))
self.pushButton.setText(_translate("Form", "弹出对话框"))
class MyMainForm(QMainWindow, Ui_Form):
def __init__(self, parent=None):
super(MyMainForm, self).__init__(parent)
self.setupUi(self)
self.pushButton.clicked.connect(self.showMsg)
def showMsg(self):
QMessageBox.information(self, '信息提示对话框','前方右拐到达目的地',QMessageBox.Yes | QMessageBox.No,QMessageBox.Yes)
QMessageBox.question(self, "提问对话框", "你要继续搞测试吗?", QMessageBox.Yes | QMessageBox.No)
QMessageBox.warning(self, "警告对话框", "继续执行会导致系统重启,你确定要继续?", QMessageBox.Yes | QMessageBox.No)
QMessageBox.critical(self, "严重错误对话框", "数组越界,程序异常退出", QMessageBox.Yes | QMessageBox.No,)
QMessageBox.about(self, "关于对话框", "你的Windows系统是DOS1.0")
if __name__ == "__main__":
app = QApplication(sys.argv)
myWin = MyMainForm()
myWin.show()
sys.exit(app.exec_())
运行结果(顺序弹出以下消息框)。
关键代码
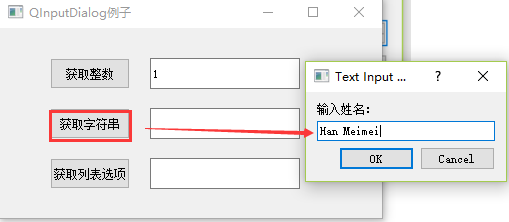
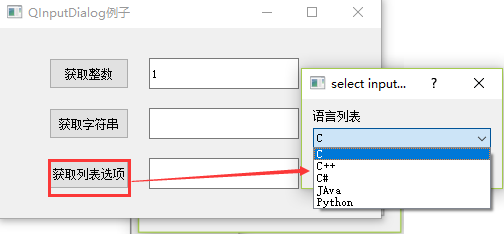
QInputDialog控件是一个标准对话框,用于获取用户输入信息,QInputDialog控件可以提供数字、字符串输入或提供下拉列表选择。
针对QInputDialog对话框控件的使用,我们主要考虑2个问题 :1、如何在弹出对话框供用户输入,2、如何获取用户输入。
QInputDialog常用方法:
getint():从输入控件中获得标准整数输入
getDouble():从输入控件中获得标准浮点数输入
getText():从输入控件中获得标准字符串的输入
getItem() :从输入控件中获得列表里的选项输入
完整代码如下(代码可直接复制运行): 1 2 3 4 5 6 7 8 9 10 11 12 13 14 15 16 17 18 19 20 21 22 23 24 25 26 27 28 29 30 31 32 33 34 35 36 37 38 39 40 41 42 43 44 45 46 47 48 49 50 51 52 53 54 55 56 57 58 59 60 61 62 63 64 65 66 67 68 69 70 71 72 73 74 import sysfrom PyQt5 import QtCore, QtGui, QtWidgetsfrom PyQt5.QtWidgets import QApplication, QMainWindow, QMessageBox,QInputDialogclass Ui_Form (object ): def setupUi (self, Form ): Form.setObjectName("Form" ) Form.resize(382 , 190 ) font = QtGui.QFont() font.setPointSize(9 ) font.setBold(False ) font.setWeight(50 ) Form.setFont(font) self.GetIntlineEdit = QtWidgets.QLineEdit(Form) self.GetIntlineEdit.setGeometry(QtCore.QRect(150 , 30 , 150 , 31 )) self.GetIntlineEdit.setText("" ) self.GetIntlineEdit.setObjectName("GetIntlineEdit" ) self.GetstrlineEdit = QtWidgets.QLineEdit(Form) self.GetstrlineEdit.setGeometry(QtCore.QRect(150 , 80 , 150 , 31 )) self.GetstrlineEdit.setObjectName("GetstrlineEdit" ) self.GetItemlineEdit = QtWidgets.QLineEdit(Form) self.GetItemlineEdit.setGeometry(QtCore.QRect(150 , 130 , 150 , 31 )) self.GetItemlineEdit.setObjectName("GetItemlineEdit" ) self.getIntButton = QtWidgets.QPushButton(Form) self.getIntButton.setGeometry(QtCore.QRect(50 , 30 , 80 , 31 )) self.getIntButton.setObjectName("getIntButton" ) self.getStrButton = QtWidgets.QPushButton(Form) self.getStrButton.setGeometry(QtCore.QRect(50 , 80 , 80 , 31 )) self.getStrButton.setObjectName("getStrButton" ) self.getItemButton = QtWidgets.QPushButton(Form) self.getItemButton.setGeometry(QtCore.QRect(50 , 130 , 80 , 31 )) self.getItemButton.setObjectName("getItemButton" ) self.retranslateUi(Form) QtCore.QMetaObject.connectSlotsByName(Form) def retranslateUi (self, Form ): _translate = QtCore.QCoreApplication.translate Form.setWindowTitle(_translate("Form" , "QInputDialog例子" )) self.getIntButton.setText(_translate("Form" , "获取整数" )) self.getStrButton.setText(_translate("Form" , "获取字符串" )) self.getItemButton.setText(_translate("Form" , "获取列表选项" )) class MyMainForm (QMainWindow, Ui_Form): def __init__ (self, parent=None ): super (MyMainForm, self).__init__(parent) self.setupUi(self) self.getIntButton.clicked.connect(self.getInt) self.getStrButton.clicked.connect(self.getStr) self.getItemButton.clicked.connect(self.getItem) def getInt (self ): num, ok = QInputDialog.getInt(self, 'Integer input dialog' , '输入数字' ) if ok and num: self.GetIntlineEdit.setText(str (num)) def getStr (self ): text, ok=QInputDialog.getText(self, 'Text Input Dialog' , '输入姓名:' ) if ok and text: self.GetstrlineEdit.setText(str (text)) def getItem (self ): items=('C' , 'C++' , 'C#' , 'JAva' , 'Python' ) item, ok=QInputDialog.getItem(self, "select input dialog" , '语言列表' , items, 0 , False ) if ok and item: self.GetItemlineEdit.setText(str (item)) if __name__ == "__main__" : app = QApplication(sys.argv) myWin = MyMainForm() myWin.show() sys.exit(app.exec_())
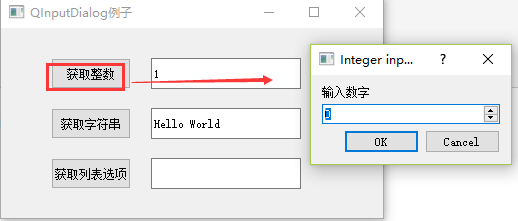
运行结果如下(会陆续弹出三个输入对话框):
关键代码介绍: QInputDialog.getInt(self, ‘Integer input dialog’, ‘输入数字’) ->
QInputDialog.getText(self, ‘Text Input Dialog’, ‘输入姓名:’) ->
QInputDialog.getItem(self, “select input dialog”, ‘语言列表’, items, -> 下拉列表选择对话框
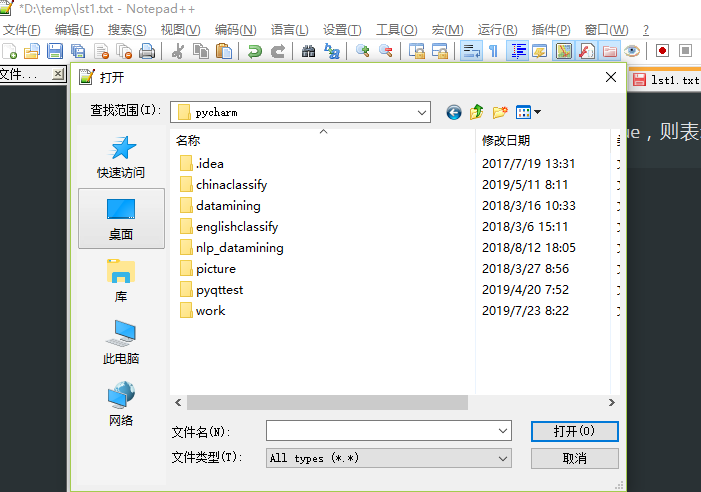
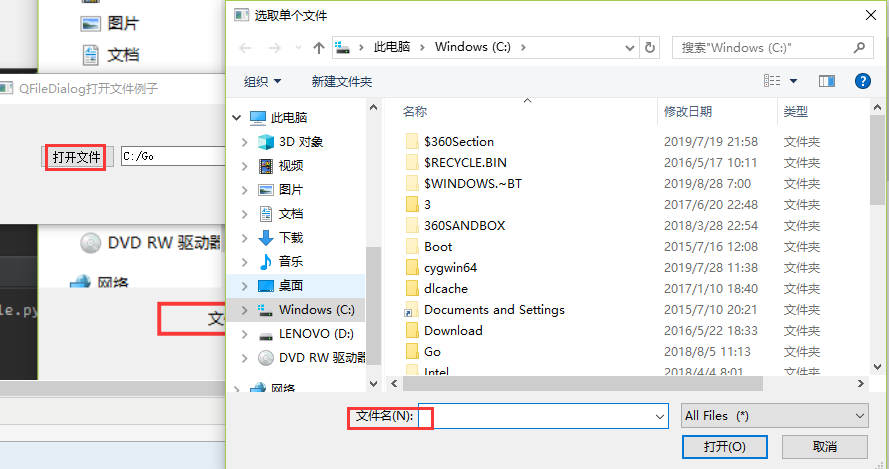
QFileDialog 文件/目录选择对话框 QFileDialog是用于打开和保存文件的标准对话框。使用QFileDialog控件主要考虑2个场景 :使用该控件提供用户选择目录或文件,并保存选择目录或文件的路径。简单说就是实现类似word/Notepad++文件打开功能。如下
针对上述场景,QFileDialog控件实现的主要方法 :
QFileDialog.getOpenFileName():获取单个文件路径
QFileDialog.getOpenFileNames():获取多个文件路径
QFileDialog.getExistingDirectory():获取文件夹路径
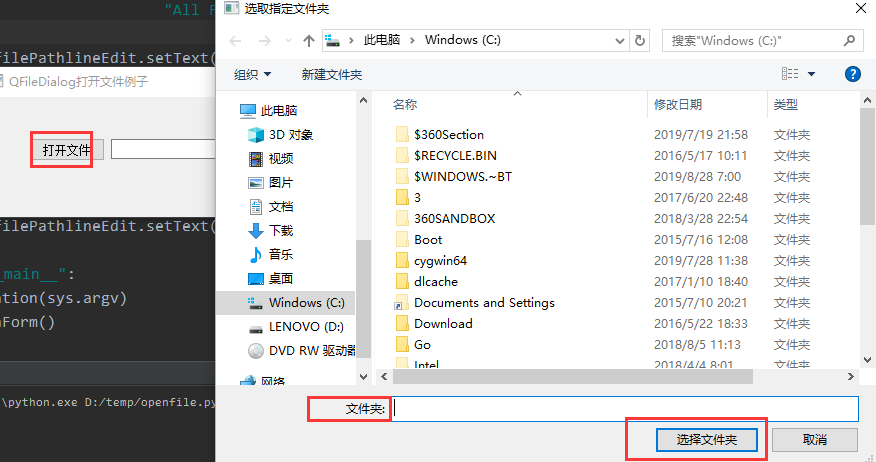
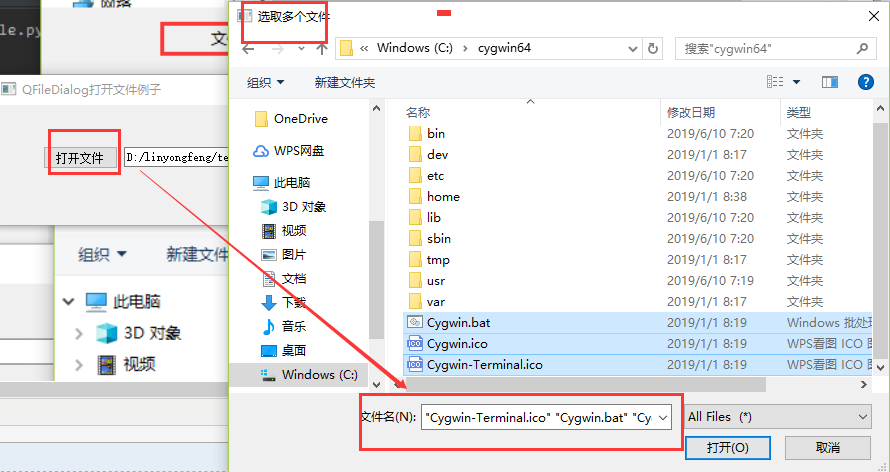
完整代码如下: 1 2 3 4 5 6 7 8 9 10 11 12 13 14 15 16 17 18 19 20 21 22 23 24 25 26 27 28 29 30 31 32 33 34 35 36 37 38 39 40 41 42 43 44 45 46 47 48 49 50 51 52 53 54 55 56 57 58 59 60 61 62 import sysfrom PyQt5 import QtCore, QtGui, QtWidgetsfrom PyQt5.QtWidgets import QApplication, QMainWindow, QMessageBox,QInputDialog,QFileDialogclass Ui_Form (object ): def setupUi (self, Form ): Form.setObjectName("Form" ) Form.resize(443 , 120 ) self.widget = QtWidgets.QWidget(Form) self.widget.setGeometry(QtCore.QRect(50 , 40 , 301 , 25 )) self.widget.setObjectName("widget" ) self.horizontalLayout = QtWidgets.QHBoxLayout(self.widget) self.horizontalLayout.setContentsMargins(0 , 0 , 0 , 0 ) self.horizontalLayout.setObjectName("horizontalLayout" ) self.openFileButton = QtWidgets.QPushButton(self.widget) self.openFileButton.setObjectName("openFileButton" ) self.horizontalLayout.addWidget(self.openFileButton) self.filePathlineEdit = QtWidgets.QLineEdit(self.widget) self.filePathlineEdit.setObjectName("filePathlineEdit" ) self.horizontalLayout.addWidget(self.filePathlineEdit) self.retranslateUi(Form) QtCore.QMetaObject.connectSlotsByName(Form) def retranslateUi (self, Form ): _translate = QtCore.QCoreApplication.translate Form.setWindowTitle(_translate("Form" , "QFileDialog打开文件例子" )) self.openFileButton.setText(_translate("Form" , "打开文件" )) class MyMainForm (QMainWindow, Ui_Form): def __init__ (self, parent=None ): super (MyMainForm, self).__init__(parent) self.setupUi(self) self.openFileButton.clicked.connect(self.openFile) def openFile (self ): get_directory_path = QFileDialog.getExistingDirectory(self, "选取指定文件夹" , "C:/" ) self.filePathlineEdit.setText(str (get_directory_path)) get_filename_path, ok = QFileDialog.getOpenFileName(self, "选取单个文件" , "C:/" , "All Files (*);;Text Files (*.txt)" ) if ok: self.filePathlineEdit.setText(str (get_filename_path)) get_filenames_path, ok = QFileDialog.getOpenFileNames(self, "选取多个文件" , "C:/" , "All Files (*);;Text Files (*.txt)" ) if ok: self.filePathlineEdit.setText(str (' ' .join(get_filenames_path))) if __name__ == "__main__" : app = QApplication(sys.argv) myWin = MyMainForm() myWin.show() sys.exit(app.exec_())
运行结果如下(会陆续弹出选择文件夹、选择单个文件、选择多个文件):
关键代码介绍 QFileDialog.getOpenFileName(self,”选取单个文件”,”C:/“,”All Files ->获取单个指定文件的绝对路径
[!TIP]
getOpenFileName()参数说明:
第1个参数:用于指定父组件
第2个参数:对话框标题
第3个参数:对话框显示时默认打开的目录。”.”表示当前程序所在目录,“/”表示当前盘下的根目录。
第4个参数:对话框中文件扩展名过滤器。All Files ();;Text Files ( .txt)表示可以选择所有文件类型或者只显示.txt后缀的文件类型。
QFileDialog.getExistingDirectory(self,”选取指定文件夹”,”C:/“) ->
QFileDialog.getOpenFileNames(self,”选取多个文件”,”C:/“,”All Files 获取多个指定文件的绝对路径
第6章 PyQt+socket实现远程操作服务器 需求内容 部分时候由于缓存刷新、验证码显示不出来或者浏览器打不开或者打开速度很慢等原因,导致部分测试同事不想使用浏览器登录服务器执行命令。期望有小工具可以替代登录浏览器的操作,直接发送指令到服务器执行并将执行结果返回。
需求设计
[!CAUTION]
1、开发界面,方便用户输入IP、用户名、密码以及执行的命令。
2、IP、用户名、密码和命令输入提供默认值。特别是用户名和密码,对于测试服务器来说,通常都是固定的。
3、IP、命令行输入框可以自动补全用户输入。自动补全常用IP、命令行可以提高操作效率。
4、可以自动保存用户执行成功的IP、命令行。用于完善自动补全命令(本文代码未实现)。
5、其他异常场景考虑:包括输入参数的合法性检查、socket发送连接服务器失败提示(连接建立、用户名/密码登录失败等)
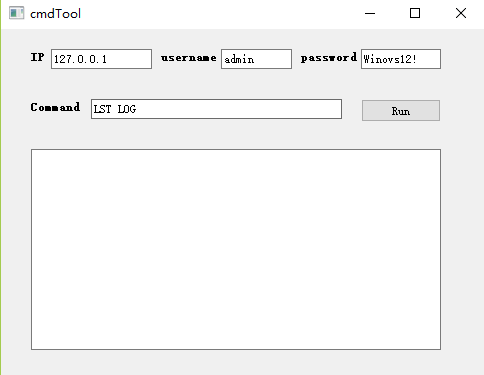
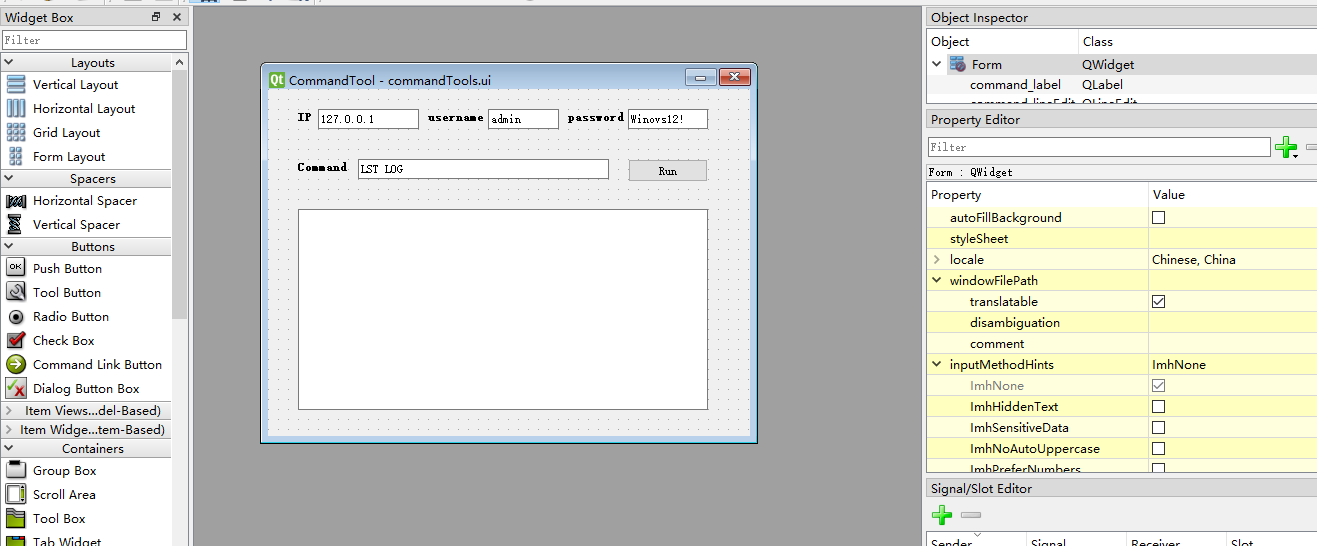
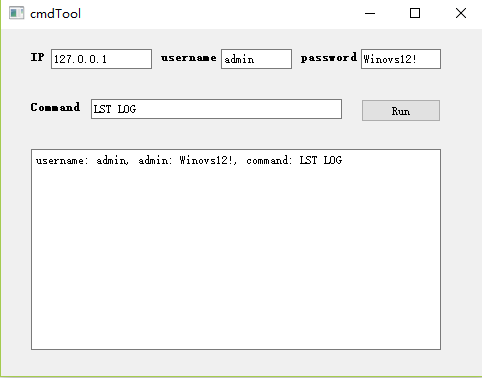
需求设计 1、使用Qt Designer实现界面开发。开发后界面参考如下:
2、使用socket程序登录服务器并执行命令,并将结果显示在界面文本框中。
开发工具 Python3.7.4 + Qt Designer + PyQt5
代码实现(程序可以直接复制运行) 1、使用Qt
2、使用pyuic5 -o commandTools.py 指令将.ui文件转换成.py文件。
生成的commandTools.py文件内容如下:
1 2 3 4 5 6 7 8 9 10 11 12 13 14 15 16 17 18 19 20 21 22 23 24 25 26 27 28 29 30 31 32 33 34 35 36 37 38 39 40 41 42 43 44 45 46 47 48 49 50 51 52 53 54 55 56 57 58 59 60 61 62 63 64 65 66 67 68 69 70 71 72 73 74 75 76 from PyQt5 import QtCore, QtGui, QtWidgetsclass Ui_Form (object ): def setupUi (self, Form ): Form.setObjectName("Form" ) Form.resize(483 , 347 ) self.ip_label = QtWidgets.QLabel(Form) self.ip_label.setGeometry(QtCore.QRect(30 , 20 , 16 , 16 )) font = QtGui.QFont() font.setBold(True ) font.setWeight(75 ) self.ip_label.setFont(font) self.ip_label.setObjectName("ip_label" ) self.ip_lineEdit = QtWidgets.QLineEdit(Form) self.ip_lineEdit.setGeometry(QtCore.QRect(50 , 20 , 101 , 20 )) self.ip_lineEdit.setObjectName("ip_lineEdit" ) self.username_label = QtWidgets.QLabel(Form) self.username_label.setGeometry(QtCore.QRect(160 , 20 , 61 , 16 )) font = QtGui.QFont() font.setBold(True ) font.setWeight(75 ) self.username_label.setFont(font) self.username_label.setObjectName("username_label" ) self.username_lineEdit = QtWidgets.QLineEdit(Form) self.username_lineEdit.setGeometry(QtCore.QRect(220 , 20 , 71 , 20 )) self.username_lineEdit.setObjectName("username_lineEdit" ) self.password_label = QtWidgets.QLabel(Form) self.password_label.setGeometry(QtCore.QRect(300 , 20 , 61 , 16 )) font = QtGui.QFont() font.setBold(True ) font.setWeight(75 ) self.password_label.setFont(font) self.password_label.setObjectName("password_label" ) self.password_lineEdit = QtWidgets.QLineEdit(Form) self.password_lineEdit.setGeometry(QtCore.QRect(360 , 20 , 80 , 20 )) self.password_lineEdit.setObjectName("password_lineEdit" ) self.command_label = QtWidgets.QLabel(Form) self.command_label.setGeometry(QtCore.QRect(30 , 70 , 51 , 16 )) font = QtGui.QFont() font.setBold(True ) font.setWeight(75 ) self.command_label.setFont(font) self.command_label.setObjectName("command_label" ) self.command_lineEdit = QtWidgets.QLineEdit(Form) self.command_lineEdit.setGeometry(QtCore.QRect(90 , 70 , 251 , 20 )) self.command_lineEdit.setObjectName("command_lineEdit" ) self.result_textBrowser = QtWidgets.QTextBrowser(Form) self.result_textBrowser.setGeometry(QtCore.QRect(30 , 120 , 410 , 201 )) self.result_textBrowser.setObjectName("result_textBrowser" ) self.run_Button = QtWidgets.QPushButton(Form) self.run_Button.setGeometry(QtCore.QRect(360 , 70 , 80 , 23 )) self.run_Button.setObjectName("run_Button" ) self.retranslateUi(Form) QtCore.QMetaObject.connectSlotsByName(Form) def retranslateUi (self, Form ): _translate = QtCore.QCoreApplication.translate Form.setWindowTitle(_translate("Form" , "cmdTool" )) self.ip_label.setText(_translate("Form" , "IP" )) self.ip_lineEdit.setText(_translate("Form" , "127.0.0.1" )) self.username_label.setText(_translate("Form" , "username" )) self.username_lineEdit.setText(_translate("Form" , "admin" )) self.password_label.setText(_translate("Form" , "password" )) self.password_lineEdit.setText(_translate("Form" , "Winovs12!" )) self.command_label.setText(_translate("Form" , "Command" )) self.command_lineEdit.setText(_translate("Form" , "LST LOG" )) self.run_Button.setText(_translate("Form" , "Run" ))
3、实现主程序callcommand.py调用(业务与逻辑分离)。代码如下:
1 2 3 4 5 6 7 8 9 10 11 12 13 14 15 16 17 18 19 20 21 22 23 24 25 26 27 28 29 30 31 32 33 34 35 36 37 38 39 40 41 42 43 44 45 46 47 48 49 50 51 52 53 54 55 56 57 58 59 60 61 62 63 64 65 66 67 68 69 70 71 72 73 74 75 76 77 78 79 80 81 82 83 84 85 86 87 88 89 90 91 92 93 import sysimport timeimport socketimport refrom PyQt5.QtWidgets import QApplication, QMainWindow,QCompleter,QMessageBoxfrom PyQt5.QtCore import Qt,QThread,pyqtSignalfrom commandTools import Ui_Formclass MyMainForm (QMainWindow, Ui_Form): def __init__ (self, parent=None ): """ 构造函数 """ super (MyMainForm, self).__init__(parent) self.setupUi(self) self.ip = "" self.username = "" self.password = "" self.command = "" self.port = 6000 self.continue_flag = True self.ip_init_lst = ['121.1.1.1' , '192.168.1.1' , '172.16.1.1' ] self.init_lineedit(self.ip_lineEdit,self.ip_init_lst) self.cmd_init_lst = ['LST LOG' , 'LST PARA' ,'MOD PARA' ] self.init_lineedit(self.command_lineEdit,self.cmd_init_lst) self.run_Button.clicked.connect(self.check_para) self.run_Button.clicked.connect(self.execte_command) def init_lineedit (self, lineedit, item_list ): """ 用户初始化控件自动补全功能 """ self.completer = QCompleter(item_list) self.completer.setFilterMode(Qt.MatchContains) self.completer.setCompletionMode(QCompleter.PopupCompletion) lineedit.setCompleter(self.completer) def execte_command (self ): """ 登录服务器,并执行命令 """ if self.continue_flag: sockethandle = socket.socket(socket.AF_INET,socket.SOCK_STREAM) rec_code = sockethandle.connect_ex((self.ip, self.port)) if rec_code == 0 : send_cmd = "username: %s, admin: %s, command: %s" % (self.username, self.password, self.command) sockethandle.sendall(send_cmd.encode('utf-8' )) time.sleep(0.5 ) recdata = sockethandle.recv(65535 ) tran_recdata = recdata.decode('utf-8' ) self.result_textBrowser.setText(tran_recdata) else : QMessageBox.information(self, '提示' ,'连接失败,请检查IP和端口是否正确' ) def check_para (self ): """ 获取用户界面输入及判断参数有效性 """ self.ip = self.ip_lineEdit.text() self.username = self.username_lineEdit.text() self.password = self.password_lineEdit.text() self.command = self.command_lineEdit.text() if len (self.ip) == 0 or self.ip.count('.' ) != 3 or len (self.ip) > 15 : self.continue_flag = False QMessageBox.information(self, '提示' ,'输入的IP不合法,请重新输入' ) if self.continue_flag and len (self.username) == 0 or len (self.password) == 0 : self.continue_flag = False QMessageBox.information(self, '提示' ,'用户名或密码未输入,请重新输入' ) if self.continue_flag and len (self.command) == 0 : self.continue_flag = False QMessageBox.information(self, '提示' ,'命令未输入,请重新输入' ) if __name__ == "__main__" : app = QApplication(sys.argv) myWin = MyMainForm() myWin.show() sys.exit(app.exec_())
4、使用pyinstaller转换成可执行的.exe文件。命令:pyinstaller -F
执行成功,生成的文件在d:\temp\dist\dist\callcommand.exe
5、运行callcommand.exe,点击run运行
关键代码 1、输入框自动补全功能函数。同样适用于下拉框控件。
1 2 3 4 5 6 7 8 9 10 11 12 def init_lineedit (self, lineedit, item_list ): """ 用户初始化控件自动补全功能 """ self.completer = QCompleter(item_list) self.completer.setFilterMode(Qt.MatchContains) self.completer.setCompletionMode(QCompleter.PopupCompletion) lineedit.setCompleter(self.completer)
实现效果如下所示:
2、socket中sendall函数要将命令使用utf-8编码,否则会导致界面卡住:
1 sockethandle.sendall(send_cmd.encode('utf-8' ))
3、需要将服务端返回的内容解码再写入textBrowser文本框,否则会导致界面卡住。
1 2 3 recdata = sockethandle.recv(65535 ) tran_recdata = recdata.decode('utf-8' ) self.result_textBrowser.setText(tran_recdata)
附录 1、PyQt5中textbrowser控件使用介绍
a、textbrowser常用设置文本方法主要为增量添加 append()、重新设置
b、如何设置显示中文。在Python3.X程序中,经常会遇到调用中文输出导致程序卡住的问题。正确设置方法参考如下:
output_str = u’设置textBrowser输出’
self.result_textBrowser.setText(output_str)
2、简易调试程序服务器搭建
由于本地没有服务器用于调试程序。所以使用socket搭建1个简易服务器以便调试。服务器功能实现将接收的命令原样返回。就是接收什么命令就给客户端返回什么内容。服务器IP为本地IP127.0.0.1,绑定端口为6000。代码如下:
1 2 3 4 5 6 7 8 9 10 11 12 13 14 15 16 17 18 19 20 21 22 import socketimport syss = socket.socket(socket.AF_INET,socket.SOCK_STREAM) print ("socket create success!" )try : s.bind(('127.0.0.1' ,6000 )) except socket.error as msg: print (msg) sys.exit(1 ) s.listen(10 ) while True : conn, addr = s.accept() print ("success" ) data = conn.recv(65535 ) conn.sendall(data.decode('utf-8' )) conn.close() s.close()
启动服务器:
简陋的有点过分,但是满足调试需求了。。。
第6章的总结 这个python+scoket需求实现的远程登录服务器执行命令只是把基本功能实现了。中间遇到的界面无响应甚至退出的问题(就是socket发送和接收内容编解码导致的)。。但是还有很多地方需要优化,比如对入参判断的优化、对连接服务器结果的判断,还有界面的美化等内容。。正是这些小需求及实践过程中遇到问题、解决问题的过程逐步提升编码能力。加油!!!!
如果你想让你开发的PyQt5工具展示的数据显得整齐、美观、好看,显得符合你的气质,可以考虑使用QTableWidget控件。之前一直使用的是textBrowser文本框控件,数据展示还是不太美观。其中QTableWidget是PyQt5程序中常用的显示数据表格的控件,显示的基本效果如下,有点素。。
下面开始介绍QTableWidget常用的方法以及如何使用。既然是数据表格形式,经常使用的场景其实跟excel我觉得差不多。开始学习使用QTableWidget之前,我们带着如下几个问题再开始本文的阅读。
[!TIP]
1、如何在GUI界面上创建QTableWidget表格?指定N行M列,列名称等等
2、如何在表格里添加每一个单元格的数据?
3、如何排版数据表格的数据,比如你想单元格内容居中、左对齐、右对齐等。
4、如何设置文字显示颜色、如何设置单元格背景色?
5、如何合并指定单元格,让排版更合理?
基本上使用数据表格展示数据常见的问题就是这些,能够熟练使用QTableWidget解决上述问题,QTableWidget基本使用方法应该就会了。下面开始学习本文内容。
setROwCount(int row) 设置QTableWidget表格控件的行数
setColumnCount(int col) 设置QTableWidget表格控件的列数
setHorizontalHeaderLabels() 设置QTableWidget表格控件的水平标签
setVerticalHeaderLabels() 设置QTableWidget表格控件的垂直标签
setItem(int ,int ,QTableWidgetItem)
horizontalHeader() 获得QTableWidget表格控件的表格头,以便执行隐藏
rowCount() 获得QTableWidget表格控件的行数
columnCount() 获得QTableWidget表格控件的列数
setEditTriggers(EditTriggers triggers)
setSelectionBehavior 设置表格的选择行为
setTextAlignment() 设置单元格内文本的对齐方式
setSpan(int row,int column,int rowSpanCount,int columnSpanCount)
setShowGrid()
setColumnWidth(int column,int width) 设置单元格行的宽度
setRowHeight(int row,int height) 设置单元格列的高度
这里的函数有些有点不好理解,比如**setSpan()**合并单元格函数,你可能一下不知道它的使用方法以及实现效果。没关系,下面会通过实例讲解以及效果演示展示这些函数的使用方法。
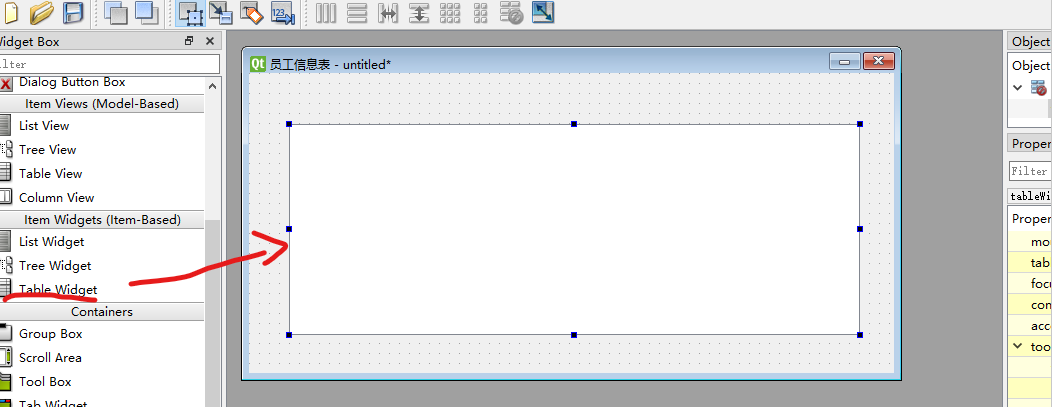
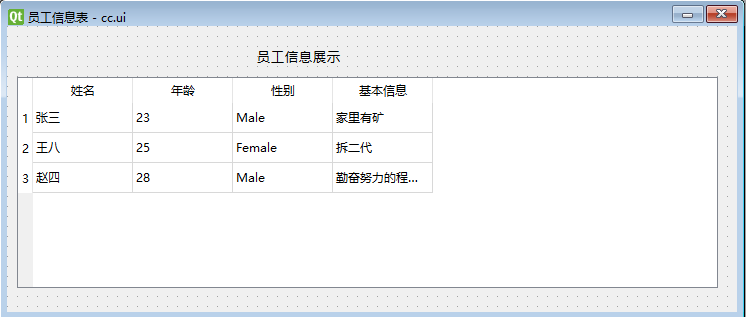
1、使用designer实现一个包含QTableWidget数据展示控件的窗体。界面设计一般都会采用designer工具,因为要考虑控件间的布局,纯代码实现会增加难度。界面实现如下
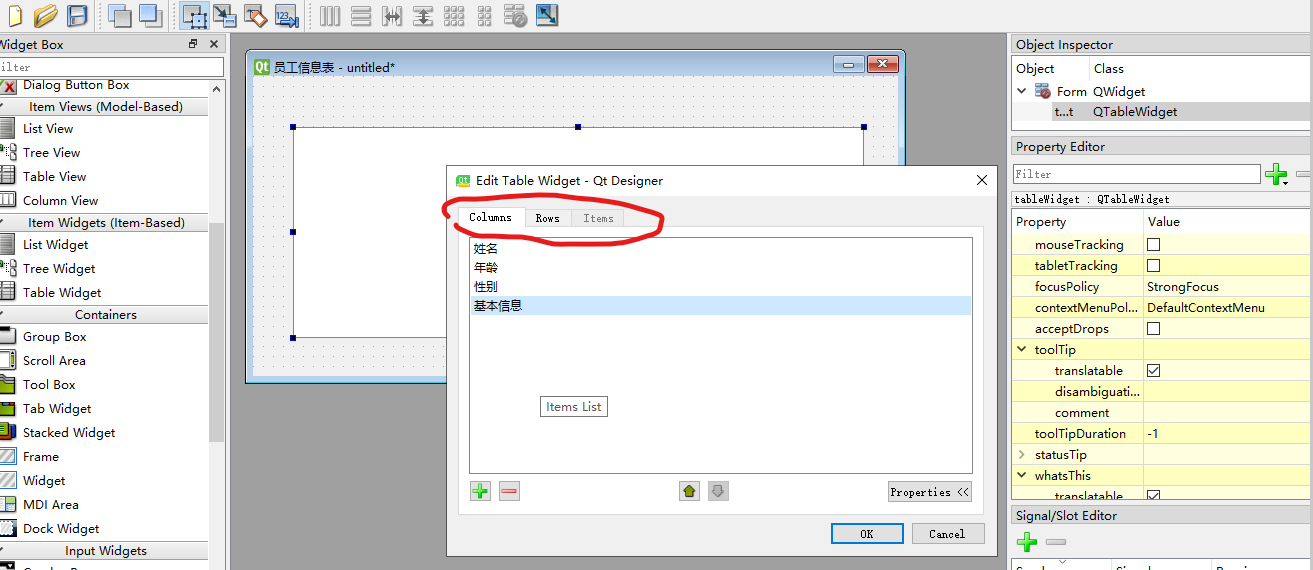
双击在窗体界面上的QTableWidget控件,分别选择Edit Table
完成后,效果图如下
2、使用pyuic5工具将.ui文件转换为.py文件。
1 2 3 4 5 6 7 8 9 10 11 12 13 14 15 16 17 18 19 20 21 22 23 24 25 26 27 28 29 30 31 32 33 34 35 36 37 38 39 40 41 42 43 44 45 46 47 48 49 50 51 52 53 54 55 56 57 58 59 60 61 62 63 64 65 66 67 68 69 70 71 72 73 74 75 76 77 78 79 80 81 82 83 84 85 86 87 88 89 90 91 92 93 94 95 96 97 98 99 100 101 102 103 104 105 106 107 from PyQt5 import QtCore, QtGui, QtWidgetsclass Ui_widget (object ): def setupUi (self, widget ): widget.setObjectName("widget" ) widget.resize(730 , 574 ) self.tableWidget = QtWidgets.QTableWidget(widget) self.tableWidget.setGeometry(QtCore.QRect(10 , 130 , 701 , 192 )) self.tableWidget.setObjectName("tableWidget" ) self.tableWidget.setColumnCount(4 ) self.tableWidget.setRowCount(3 ) item = QtWidgets.QTableWidgetItem() self.tableWidget.setVerticalHeaderItem(0 , item) item = QtWidgets.QTableWidgetItem() self.tableWidget.setVerticalHeaderItem(1 , item) item = QtWidgets.QTableWidgetItem() self.tableWidget.setVerticalHeaderItem(2 , item) item = QtWidgets.QTableWidgetItem() item.setTextAlignment(QtCore.Qt.AlignCenter) self.tableWidget.setHorizontalHeaderItem(0 , item) item = QtWidgets.QTableWidgetItem() self.tableWidget.setHorizontalHeaderItem(1 , item) item = QtWidgets.QTableWidgetItem() self.tableWidget.setHorizontalHeaderItem(2 , item) item = QtWidgets.QTableWidgetItem() self.tableWidget.setHorizontalHeaderItem(3 , item) item = QtWidgets.QTableWidgetItem() self.tableWidget.setItem(0 , 0 , item) item = QtWidgets.QTableWidgetItem() self.tableWidget.setItem(0 , 1 , item) item = QtWidgets.QTableWidgetItem() self.tableWidget.setItem(0 , 2 , item) item = QtWidgets.QTableWidgetItem() self.tableWidget.setItem(0 , 3 , item) item = QtWidgets.QTableWidgetItem() self.tableWidget.setItem(1 , 0 , item) item = QtWidgets.QTableWidgetItem() self.tableWidget.setItem(1 , 1 , item) item = QtWidgets.QTableWidgetItem() self.tableWidget.setItem(1 , 2 , item) item = QtWidgets.QTableWidgetItem() self.tableWidget.setItem(1 , 3 , item) item = QtWidgets.QTableWidgetItem() self.tableWidget.setItem(2 , 0 , item) item = QtWidgets.QTableWidgetItem() self.tableWidget.setItem(2 , 1 , item) item = QtWidgets.QTableWidgetItem() self.tableWidget.setItem(2 , 2 , item) item = QtWidgets.QTableWidgetItem() self.tableWidget.setItem(2 , 3 , item) self.tableWidget.horizontalHeader().setCascadingSectionResizes(True ) self.retranslateUi(widget) QtCore.QMetaObject.connectSlotsByName(widget) def retranslateUi (self, widget ): _translate = QtCore.QCoreApplication.translate widget.setWindowTitle(_translate("widget" , "员工信息表" )) item = self.tableWidget.verticalHeaderItem(0 ) item.setText(_translate("widget" , "1" )) item = self.tableWidget.verticalHeaderItem(1 ) item.setText(_translate("widget" , "2" )) item = self.tableWidget.verticalHeaderItem(2 ) item.setText(_translate("widget" , "3" )) item = self.tableWidget.horizontalHeaderItem(0 ) item.setText(_translate("widget" , "姓名" )) item = self.tableWidget.horizontalHeaderItem(1 ) item.setText(_translate("widget" , "年龄" )) item = self.tableWidget.horizontalHeaderItem(2 ) item.setText(_translate("widget" , "性别" )) item = self.tableWidget.horizontalHeaderItem(3 ) item.setText(_translate("widget" , "基本信息" )) __sortingEnabled = self.tableWidget.isSortingEnabled() self.tableWidget.setSortingEnabled(False ) item = self.tableWidget.item(0 , 0 ) item.setText(_translate("widget" , "张三" )) item = self.tableWidget.item(0 , 1 ) item.setText(_translate("widget" , "23" )) item = self.tableWidget.item(0 , 2 ) item.setText(_translate("widget" , "Male" )) item = self.tableWidget.item(0 , 3 ) item.setText(_translate("widget" , "家里有矿" )) item = self.tableWidget.item(1 , 0 ) item.setText(_translate("widget" , "王八" )) item = self.tableWidget.item(1 , 1 ) item.setText(_translate("widget" , "25" )) item = self.tableWidget.item(1 , 2 ) item.setText(_translate("widget" , "Female" )) item = self.tableWidget.item(1 , 3 ) item.setText(_translate("widget" , "拆二代" )) item = self.tableWidget.item(2 , 0 ) item.setText(_translate("widget" , "赵四" )) item = self.tableWidget.item(2 , 1 ) item.setText(_translate("widget" , "28" )) item = self.tableWidget.item(2 , 2 ) item.setText(_translate("widget" , "Male" )) item = self.tableWidget.item(2 , 3 ) item.setText(_translate("widget" , "勤奋努力的程序员" )) self.tableWidget.setSortingEnabled(__sortingEnabled)
附designer工具设计完成的.ui文件代码。不作展示,方便有需要的读者下载使用。
1 2 3 4 5 6 7 8 9 10 11 12 13 14 15 16 17 18 19 20 21 22 23 24 25 26 27 28 29 30 31 32 33 34 35 36 37 38 39 40 41 42 43 44 45 46 47 48 49 50 51 52 53 54 55 56 57 58 59 60 61 62 63 64 65 66 67 68 69 70 71 72 73 74 75 76 77 78 79 80 81 82 83 84 85 86 87 88 89 90 91 92 93 94 95 96 97 98 99 100 101 102 103 104 105 106 107 108 109 110 111 112 113 114 115 116 117 118 119 120 121 122 123 124 125 126 127 128 129 130 131 132 133 134 135 136 137 138 139 140 141 142 143 144 145 146 147 148 149 150 151 152 153 154 155 <?xml version="1.0" encoding="UTF-8" ?> <ui version="4.0" > <class >widget</class > <widget class ="QWidget" name="widget" > <property name="geometry" > <rect> <x>0 </x> <y>0 </y> <width>730 </width> <height>286 </height> </rect> </property > <property name="font" > <font> <pointsize>10 </pointsize> </font> </property > <property name="windowTitle" > <string>员工信息表</string> </property > <widget class ="QTableWidget" name="tableWidget" > <property name="geometry" > <rect> <x>10 </x> <y>51 </y> <width>701 </width> <height>211 </height> </rect> </property > <attribute name="horizontalHeaderCascadingSectionResizes" > <bool >true</bool > </attribute> <row> <property name="text" > <string>1 </string> </property > </row> <row> <property name="text" > <string>2 </string> </property > </row> <row> <property name="text" > <string>3 </string> </property > </row> <column> <property name="text" > <string>姓名</string> </property > <property name="textAlignment" > <set >AlignCenter</set > </property > </column> <column> <property name="text" > <string>年龄</string> </property > </column> <column> <property name="text" > <string>性别</string> </property > </column> <column> <property name="text" > <string>基本信息</string> </property > </column> <item row="0" column="0" > <property name="text" > <string>张三</string> </property > </item> <item row="0" column="1" > <property name="text" > <string>23 </string> </property > </item> <item row="0" column="2" > <property name="text" > <string>Male</string> </property > </item> <item row="0" column="3" > <property name="text" > <string>家里有矿</string> </property > </item> <item row="1" column="0" > <property name="text" > <string>王八</string> </property > </item> <item row="1" column="1" > <property name="text" > <string>25 </string> </property > </item> <item row="1" column="2" > <property name="text" > <string>Female</string> </property > </item> <item row="1" column="3" > <property name="text" > <string>拆二代</string> </property > </item> <item row="2" column="0" > <property name="text" > <string>赵四</string> </property > </item> <item row="2" column="1" > <property name="text" > <string>28 </string> </property > </item> <item row="2" column="2" > <property name="text" > <string>Male</string> </property > </item> <item row="2" column="3" > <property name="text" > <string>勤奋努力的程序员</string> </property > </item> </widget> <widget class ="QLabel" name="label" > <property name="geometry" > <rect> <x>250 </x> <y>20 </y> <width>111 </width> <height>21 </height> </rect> </property > <property name="font" > <font> <family>YaHei Consolas Hybrid</family> <pointsize>10 </pointsize> </font> </property > <property name="text" > <string>员工信息展示</string> </property > </widget> </widget> <resources/> <connections/> </ui> 复制代码
3、编写主程序,调用界面.py文件。使业界面和逻辑程序分离,这样的好处就是后面界面任何改动程序逻辑几乎不会有什么大的影响。
# -*- coding: utf-8 -*-
# Form implementation generated from reading ui file 'connect_me.ui'
#
# Created by: PyQt5 UI code generator 5.11.3
#
# WARNING! All changes made in this file will be lost!
#导入程序运行必须模块
import sys
from PyQt5.QtWidgets import *
from PyQt5.QtGui import QColor, QBrush
from cc import Ui_widget
class MyMainForm(QMainWindow, Ui_widget):
def __init__(self, parent=None):
super(MyMainForm, self).__init__(parent)
self.setupUi(self)
if __name__ == "__main__":
app = QApplication(sys.argv)
myWin = MyMainForm()
myWin.show()
sys.exit(app.exec_())
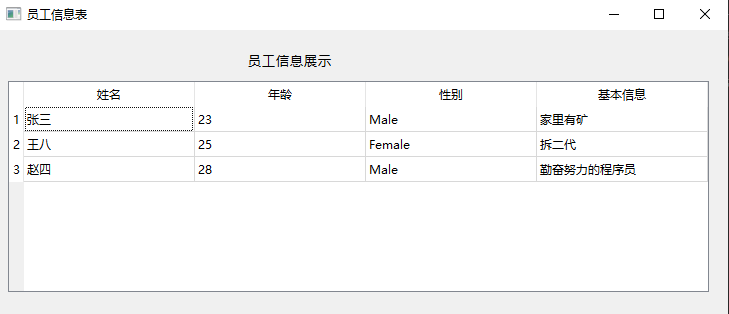
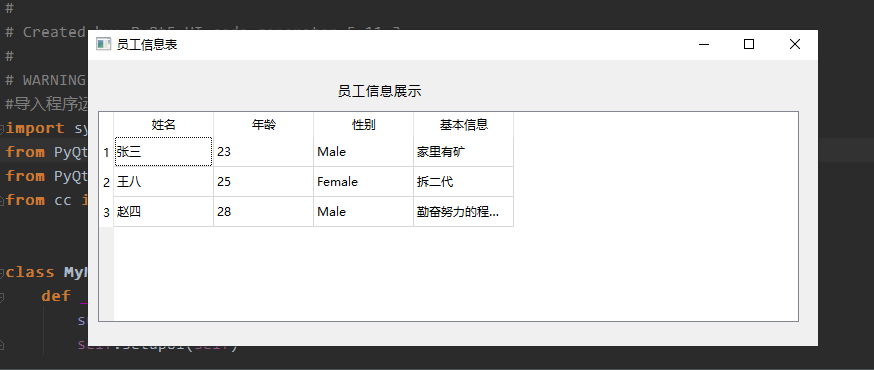
运行程序结果如下:
4、程序运行可以正常显示界面,但是界面并不是很美观(比如行、列没有铺满整个显示窗口、列标题文字没有加粗等)。下面通过QTableWidget相关函数的使用来实现优化。
上述基本例子实现了员工信息表格展示的初始化,单元格内容手工添加其实在实现场景不合适,只是方便展示,下面讲解如何通过代码实现方式添加单元格内容以及实现单元格内容颜色、字体变化的实现。说明,下述所有代码添加都在主程序中完成。目的是使程序实现更灵活,方便维护。
(1)初始化QTableWidget数据展示窗口对象。一般来说该步骤通常是通过designer实现。
1 2 3 self.tableWidget = QtWidgets.QTableWidget(widget) self.tableWidget.setColumnCount(4 ) self.tableWidget.setRowCount(3 )
设置表格的行、列标题,如下:
1 2 self.tableWidget.setHorizontalHeaderLabels(['姓名' ,'年龄' ]) self.tableWidget.setVerticalHeaderLabels(['1' ,'2' ])
当然也可以通过上面例子中的方式去添加,如下:
1 2 3 4 5 item = QtWidgets.QTableWidgetItem() self.tableWidget.setVerticalHeaderItem(1 , item) item = QtWidgets.QTableWidgetItem() self.tableWidget.setHorizontalHeaderItem(1 , item)
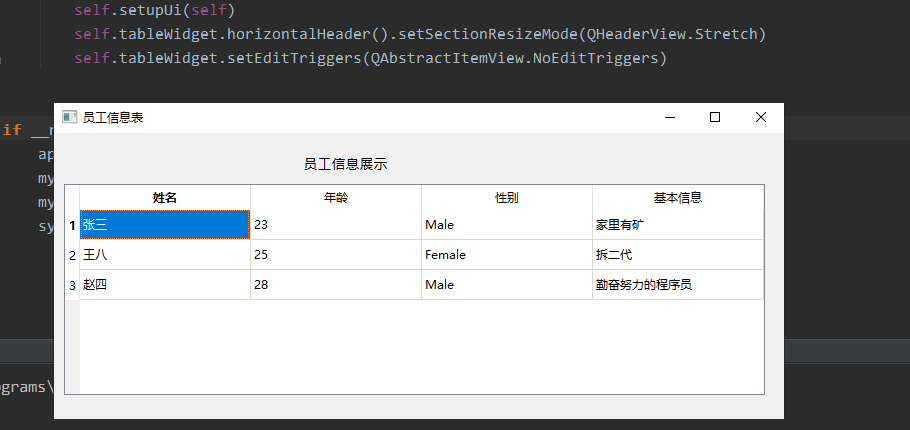
(2)设置表格头的伸缩模式,也就是让表格铺满整个QTableWidget控件。
1 2 self.tableWidget.horizontalHeader().setSectionResizeMode(QHeaderView.Stretch) 效果如下:
(2)将表格变为禁止编辑。默认情况下表格中的字符串是可以更改的,比如双击一个单元格,就可以修改运来的内容。如果想禁止这种操作,让表格对用户是只读的,可以添加如下代码。
self.tableWidget.setEditTriggers(QAbstractItemView.NoEditTriggers)
运行效果(双击单元格不可编辑,提前观察一下鼠标单击选中的只是单元格):
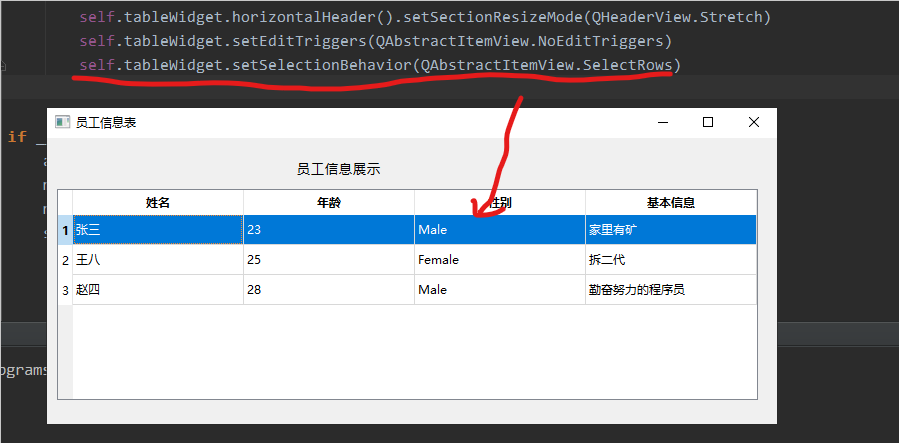
(3)设置表格整行选中。表格默认选中的是单个单元格。通过下面代码可以设置成选中整行。添加代码如下
self.tableWidget.setSelectionBehavior(QAbstractItemView.SelectRows)
运行效果如下:
另外,单元格选中的类型还可以修改成如下方式:
QAbstractItemView.SelectColumns 选中1列
QAbstractItemView.SelectRows 选中1行
QAbstractItemView.SelectItems 选中1个单元格
(4)行、列标题的显示与隐藏。
对于列标题的显示或隐藏设置,可以通过添加如下代码实现。默认是显示的。
1 2 3 4 5 self.tableWidget.horizontalHeader().setVisible(False ) 运行效果如下(行标题不再显示): 对于行标题,可以使用如下代码进行隐藏或显示设置。默认是显示 self.tableWidget.verticalHeader().setVisible(
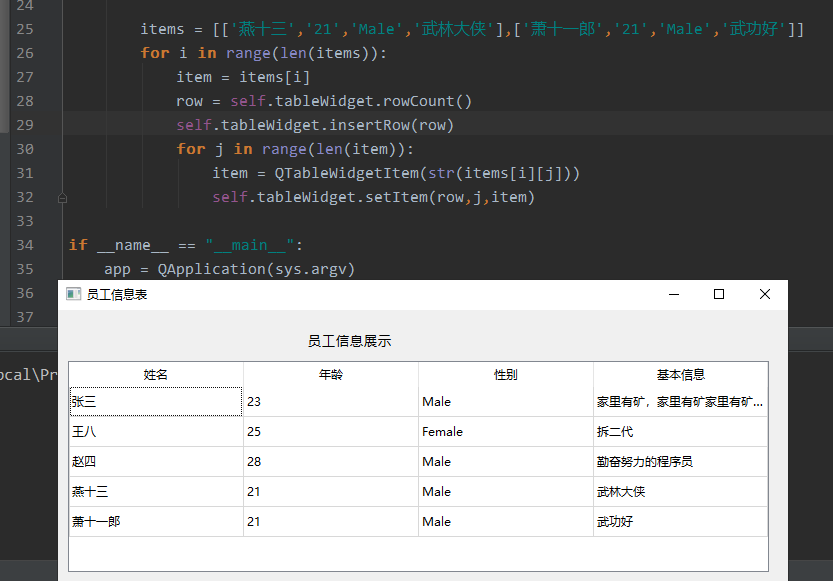
(5)在表格中添加内容。代码如下:
items = [['燕十三','21','Male','武林大侠'],['萧十一郎','21','Male','武功好']]
for i in range(len(items)):
item = items[i]
row = self.tableWidget.rowCount()
self.tableWidget.insertRow(row)
for j in range(len(item)):
item = QTableWidgetItem(str(items[i][j]))
self.tableWidget.setItem(row,j,item)
运行结果如下:
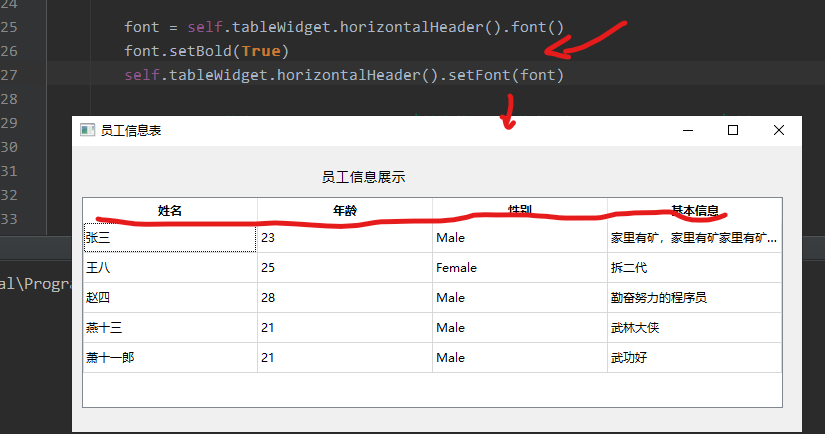
(6) 设置表格标题字体加粗。添加代码如下:
1 2 3 font = self.tableWidget.horizontalHeader().font() font.setBold(True ) self.tableWidget.horizontalHeader().setFont(font)
运行效果如下
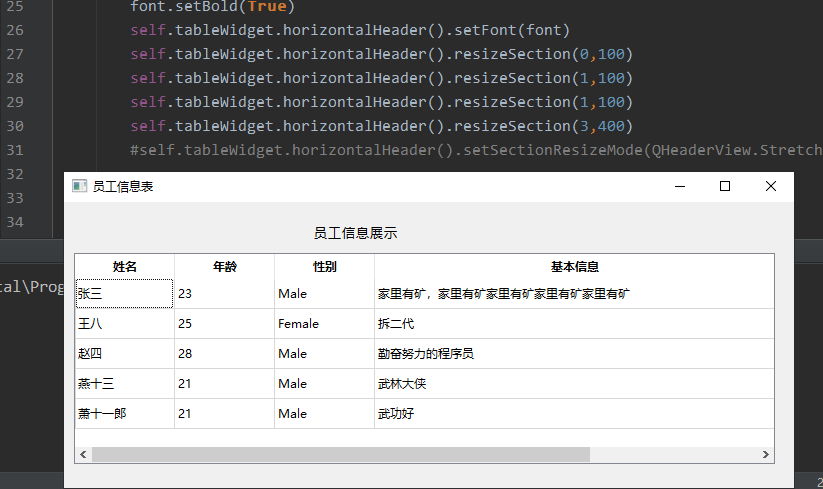
(7) 设置表格指定列宽。添加代码如下:
1 2 3 4 5 self.tableWidget.horizontalHeader().resizeSection(0 ,100 ) self.tableWidget.horizontalHeader().resizeSection(1 ,100 ) self.tableWidget.horizontalHeader().resizeSection(1 ,100 ) self.tableWidget.horizontalHeader().resizeSection(3 ,400 )
说明,表头的自适应模式要注释,否则上述设置不生效。运行效果如下:
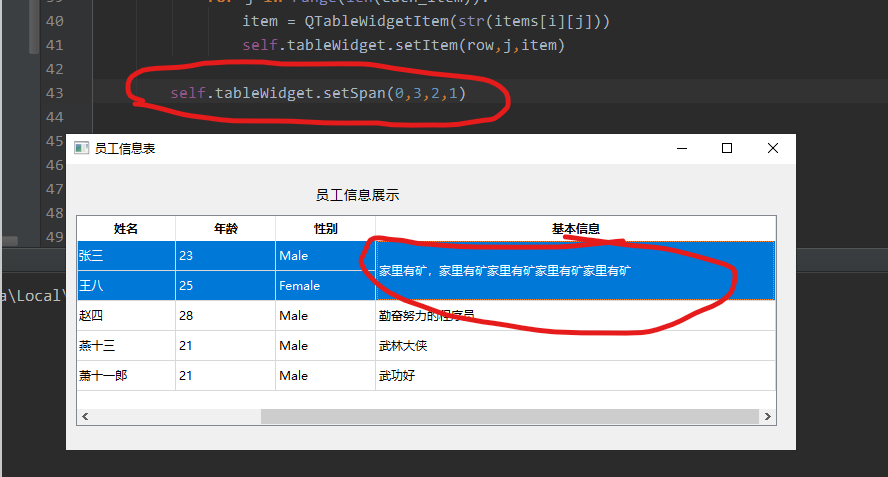
(8)合并单元格,添加如下代码
1 self.tableWidget.setSpan(0 ,3 ,2 ,1 )
运行结果如下:
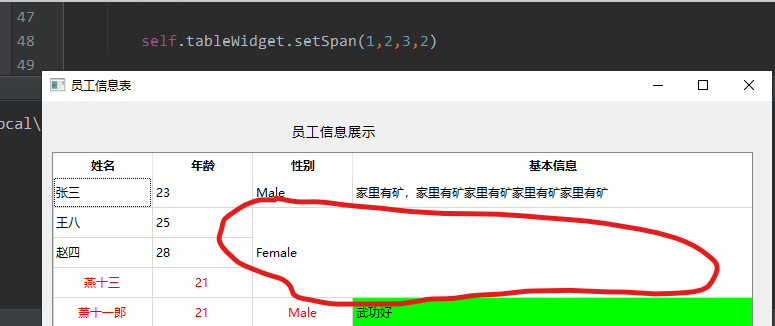
这里再补充描述一下setSpan()函数。setSpan(0,3,2,1)函数中(0,3)会指定到单元格第1行第4列(下标都是从0开始计算),(2,1)分别表示合并2行(把下一行合并了),1列(1列,列其实没有合并)。我们把代码修改为setSpan(1,2,3,2)。看效果如下(很直观了吧):
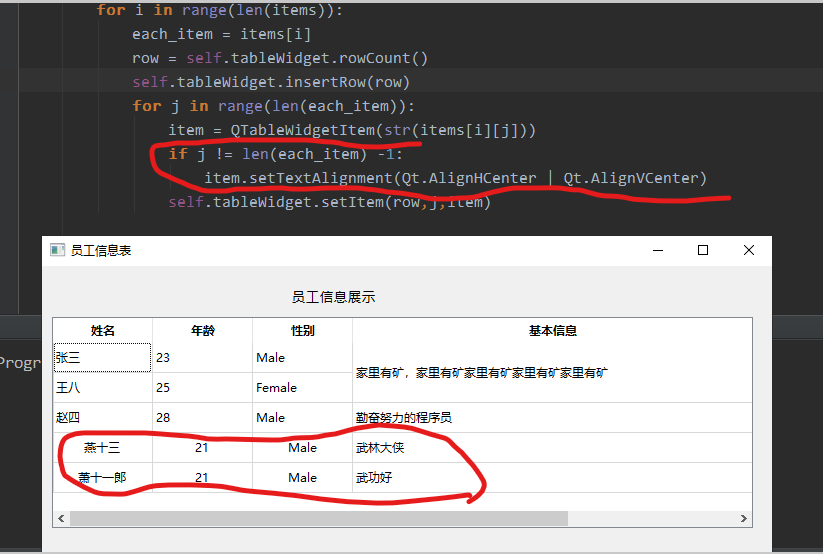
(9)对齐单元格中的内容。添加代码如下:
1 2 3 4 5 6 7 8 9 for i in range (len (items)): each_item = items[i] row = self.tableWidget.rowCount() self.tableWidget.insertRow(row) for j in range (len (each_item)): item = QTableWidgetItem(str (items[i][j])) if j != len (each_item) -1 : item.setTextAlignment(Qt.AlignHCenter | Qt.AlignVCenter) self.tableWidget.setItem(row,j,item)
关键代码就是item.setTextAlignment(Qt.AlignHCenter |
另外,单元格内容对齐还有如下几种方式。
Qt.AlignLeft 将单元格内容沿单元格左边缘对齐
Qt.AlignRight 将单元格内容沿单元格右边缘对齐
Qt.AlignHCenter 将单元格内容居中显示在水平方向上。
Qt.AlignJustify 将文本在可用的空间中对齐,默认是从左到右的
Qt.AlignTop 与顶部对齐
Qt.AlignBottom 与底部对齐
Qt.AlignVCenter 在可用的空间中,居中显示在垂直方向上
Qt.AlignBaseline 与基线对齐
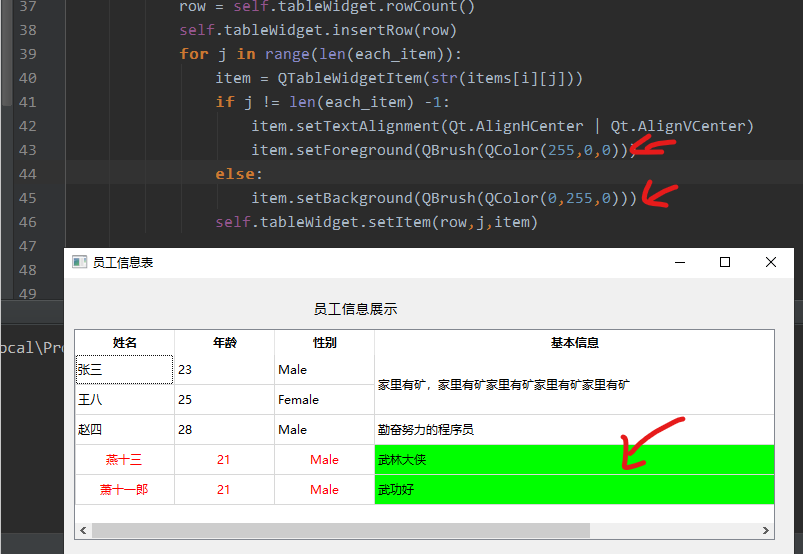
(10)设置单元格字体颜色和背景颜色。添加代码如下:
1 2 3 4 5 6 7 8 9 10 11 12 for i in range (len (items)): each_item = items[i] row = self.tableWidget.rowCount() self.tableWidget.insertRow(row) for j in range (len (each_item)): item = QTableWidgetItem(str (items[i][j])) if j != len (each_item) -1 : item.setTextAlignment(Qt.AlignHCenter | Qt.AlignVCenter) item.setForeground(QBrush(QColor(255 ,0 ,0 ))) else : item.setBackground(QBrush(QColor(0 ,255 ,0 ))) self.tableWidget.setItem(row,j,item)
运行结果如下所示:
QTableWidget控件的基本使用方法就到这里,后续有其他更好的使用技巧会继续更新,为方便自己及大家阅读本文,附本文使用到的代码如下:
# -*- coding: utf-8 -*-
# Form implementation generated from reading ui file 'connect_me.ui'
#
# Created by: PyQt5 UI code generator 5.11.3
#
# WARNING! All changes made in this file will be lost!
#导入程序运行必须模块
import sys
from PyQt5.QtWidgets import *
from PyQt5.QtGui import QColor, QBrush
from PyQt5.QtCore import Qt
from cc import Ui_widget
class MyMainForm(QMainWindow, Ui_widget):
def __init__(self, parent=None):
super(MyMainForm, self).__init__(parent)
self.setupUi(self)
#self.tableWidget.horizontalHeader().setSectionResizeMode(QHeaderView.Stretch)
self.tableWidget.setEditTriggers(QAbstractItemView.NoEditTriggers)
self.tableWidget.setSelectionBehavior(QAbstractItemView.SelectRows)
#self.tableWidget.horizontalHeader().setVisible(False)
self.tableWidget.verticalHeader().setVisible(False)
font = self.tableWidget.horizontalHeader().font()
font.setBold(True)
self.tableWidget.horizontalHeader().setFont(font)
self.tableWidget.horizontalHeader().resizeSection(0,100)
self.tableWidget.horizontalHeader().resizeSection(1,100)
self.tableWidget.horizontalHeader().resizeSection(1,100)
self.tableWidget.horizontalHeader().resizeSection(3,400)
#self.tableWidget.horizontalHeader().setSectionResizeMode(QHeaderView.Stretch)
items = [['燕十三','21','Male','武林大侠'],['萧十一郎','21','Male','武功好']]
for i in range(len(items)):
each_item = items[i]
row = self.tableWidget.rowCount()
self.tableWidget.insertRow(row)
for j in range(len(each_item)):
item = QTableWidgetItem(str(items[i][j]))
if j != len(each_item) -1:
item.setTextAlignment(Qt.AlignHCenter | Qt.AlignVCenter)
item.setForeground(QBrush(QColor(255,0,0)))
else:
item.setBackground(QBrush(QColor(0,255,0)))
self.tableWidget.setItem(row,j,item)
self.tableWidget.setSpan(1,2,3,2)
if __name__ == "__main__":
app = QApplication(sys.argv)
myWin = MyMainForm()
myWin.show()
sys.exit(app.exec_())
总结 本章描述PyQt5的QTableWidget控件的基本使用方法和效果,界面实现建议还是desiger设计工具实现,同时使用业务和逻辑相分离的方式编写程序,都揉在一块后面程序就不好维护,毕竟没有谁的工具实现是可以一蹴而就的,还是要考虑可维护性。读完本文内容相信读者就可以上手使用QTableWidget控件了。
第8章 PyQt5中多线程模块QThread使用方法 本文主要讲解使用多线程模块QThread解决PyQt界面程序唉执行耗时操作时,程序卡顿出现的无响应以及界面输出无法实时显示的问题。用户使用工具过程中出现这些问题时会误以为程序出错,从而把程序关闭。这样,导致工具的用户使用体验不好。下面我们通过模拟上述出现的问题并讲述使用多线程QThread模块解决此类问题的方法。
PyQt程序卡顿和无法实时显示问题现象 使用PyQt实现在文本框中每秒打印1个数字。程序代码如下(QThread_Example_UI.py和QThread_Example_UI.ui见附录):
[
# -*- coding: utf-8 -*-
import sys
import time
from PyQt5.QtCore import QThread, pyqtSignal
from PyQt5.QtWidgets import QApplication, QMainWindow
from QThread_Example_UI import Ui_Form
class MyMainForm(QMainWindow, Ui_Form):
def __init__(self, parent=None):
super(MyMainForm, self).__init__(parent)
self.setupUi(self)
self.runButton.clicked.connect(self.display)
def display(self):
for i in range(20):
time.sleep(1)
self.listWidget.addItem(str(i))
if __name__ == "__main__":
app = QApplication(sys.argv)
myWin = MyMainForm()
myWin.show()
sys.exit(app.exec_())
[
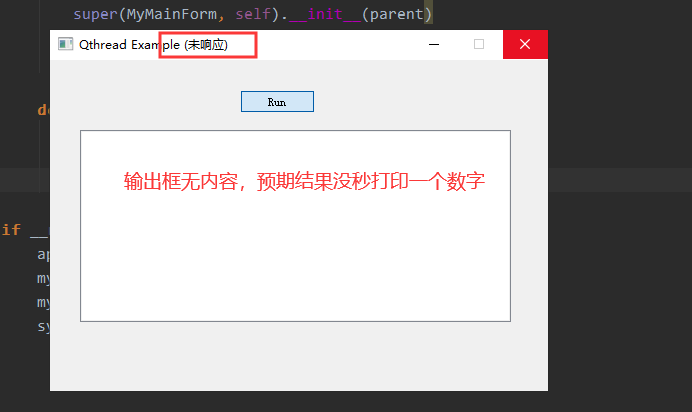
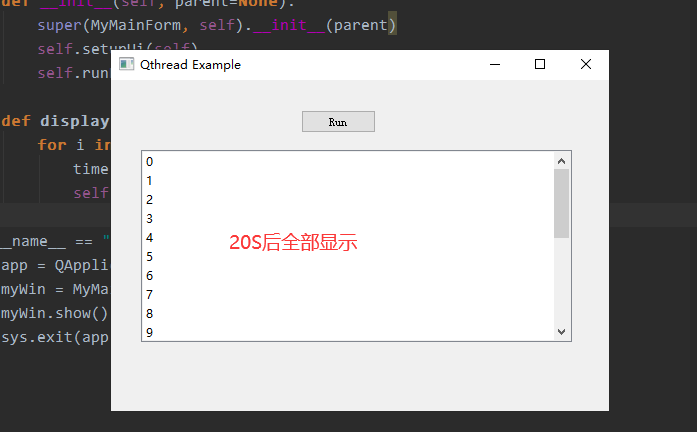
程序运行过程结果如下(点击Run按钮后界面出现未响应 字样, 同时程序也没有出现每隔1秒打印1个数字,实际结果是循环结束后20个数字一同展示):
问题分析
上述实现的GUI程序都是单线程运行,对于需要执行一个特别耗时的操作时就会出现该问题现象。要解决这种问题可以考虑使用多线程模块QThread。
多线程模块QThread基本原理 QThread是Qt的线程类中最核心的底层类。由于PyQt的的跨平台特性,QThread要隐藏所有与平台相关的代码
1 2 3 4 5 class Thread (QThread ): def __init__ (self ): super (Thread,self).__init__() def run (self ):
接下来创建一个新的线程
1 2 thread = Thread() thread.start()
可以看出,PyQt的线程使用非常简单,建立一个自定义的类(如Thread),自我继承自QThread
业务的线程任务就写在run()函数中,当run()退出之后线程就基本结束了,QThread有started和finished信号,可以为这两个信号指定槽函数,在线程启动和结束之时执行一段代码进行资源的初始化和释放操作,更灵活的使用方法是,在自定义的QThread实例中自定义信号,并将信号连接到指定的槽函数,当满足一定的业务条件时发射此信号。
QThread类中的常用方法 start(): 启动线程
wait(): 阻止线程,直到满足如下条件之一
(1)与此QThread对象关联的线程已完成执行(即从run返回时),如果线程完成执行,此函数返回True,如果线程尚未启动,也返回True
(2)等待时间的单位是毫秒,如果时间是ULONG_MAX(默认值·),则等待,永远不会超时(线程必须从run返回),如果等待超时,此函数将会返回False
sleep(): 强制当前线程睡眠多少秒
QThread类中的常用信号
started: 在开始执行run函数之前,从相关线程发射此信号
finished: 当程序完成业务逻辑时,从相关线程发射此信号
使用QThread重新实现程序解决问题 先继承QThread类创建多线程,使用主线程更新界面,使用子线程实时处理数据(重写run()函数,将耗时的操作放入run()函数中),最后将结果显示到界面上。代码如下:
1 2 3 4 5 6 7 8 9 10 11 12 13 14 15 16 17 18 19 20 21 22 23 24 25 26 27 28 29 30 31 32 33 34 35 36 37 38 39 40 41 42 43 44 45 46 47 import sysimport timefrom PyQt5.QtCore import QThread, pyqtSignalfrom PyQt5.QtWidgets import QApplication, QMainWindowfrom QThread_Example_UI import Ui_Formclass MyMainForm (QMainWindow, Ui_Form): def __init__ (self, parent=None ): super (MyMainForm, self).__init__(parent) self.setupUi(self) self.work = WorkThread() self.runButton.clicked.connect(self.execute) def execute (self ): self.work.start() self.work.trigger.connect(self.display) def display (self,str ): self.listWidget.addItem(str ) class WorkThread (QThread ): trigger = pyqtSignal(str ) def __int__ (self ): super (WorkThread, self).__init__() def run (self ): for i in range (20 ): time.sleep(1 ) self.trigger.emit(str (i)) if __name__ == "__main__" : app = QApplication(sys.argv) myWin = MyMainForm() myWin.show() sys.exit(app.exec_())
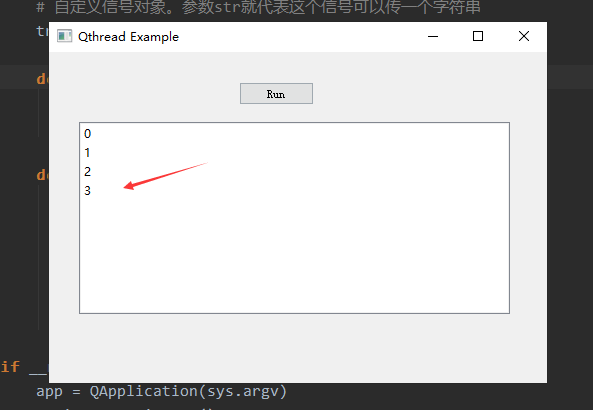
程序运行结果如下(实现了每隔1秒打印1个数字):
小结 如果你实现的工具需要执行特别耗时的操作,可以参考使用本文多线程QThread处理方法实现。当然,工具实际实现过程中的场景会比这复杂。比如,你的输出并不是有固定时间间隔输出的文本框,可以尝试使用多次self.trigger.emit(str)方法进行操作。
附录 1、使用pyuic5转换界面.ui程序后的QThread_Example_UI.py代码如下:
1 2 3 4 5 6 7 8 9 10 11 12 13 14 15 16 17 18 19 20 21 22 from PyQt5 import QtCore, QtGui, QtWidgetsclass Ui_Form (object ): def setupUi (self, Form ): Form.setObjectName("Form" ) Form.resize(498 , 331 ) self.runButton = QtWidgets.QPushButton(Form) self.runButton.setGeometry(QtCore.QRect(190 , 30 , 75 , 23 )) self.runButton.setObjectName("runButton" ) self.listWidget = QtWidgets.QListWidget(Form) self.listWidget.setGeometry(QtCore.QRect(30 , 70 , 431 , 192 )) self.listWidget.setObjectName("listWidget" ) self.retranslateUi(Form) QtCore.QMetaObject.connectSlotsByName(Form) def retranslateUi (self, Form ): _translate = QtCore.QCoreApplication.translate Form.setWindowTitle(_translate("Form" , "Qthread Example" )) self.runButton.setText(_translate("Form" , "Run" ))
2、Qtdesigner设计的界面源程序代码QThread_Example_UI.ui如下:
``` pythonForm 0 0 498 331 Qthread Example 190 30 75 23 Run 30 70 431 192

















 ](javascript:void(0)😉
 ](javascript:void(0)😉